Red Velvet Cheesecake
I may receive compensation in the form of payment or products to supplement my posts, but all opinions remain my own. Read our disclosure policy.

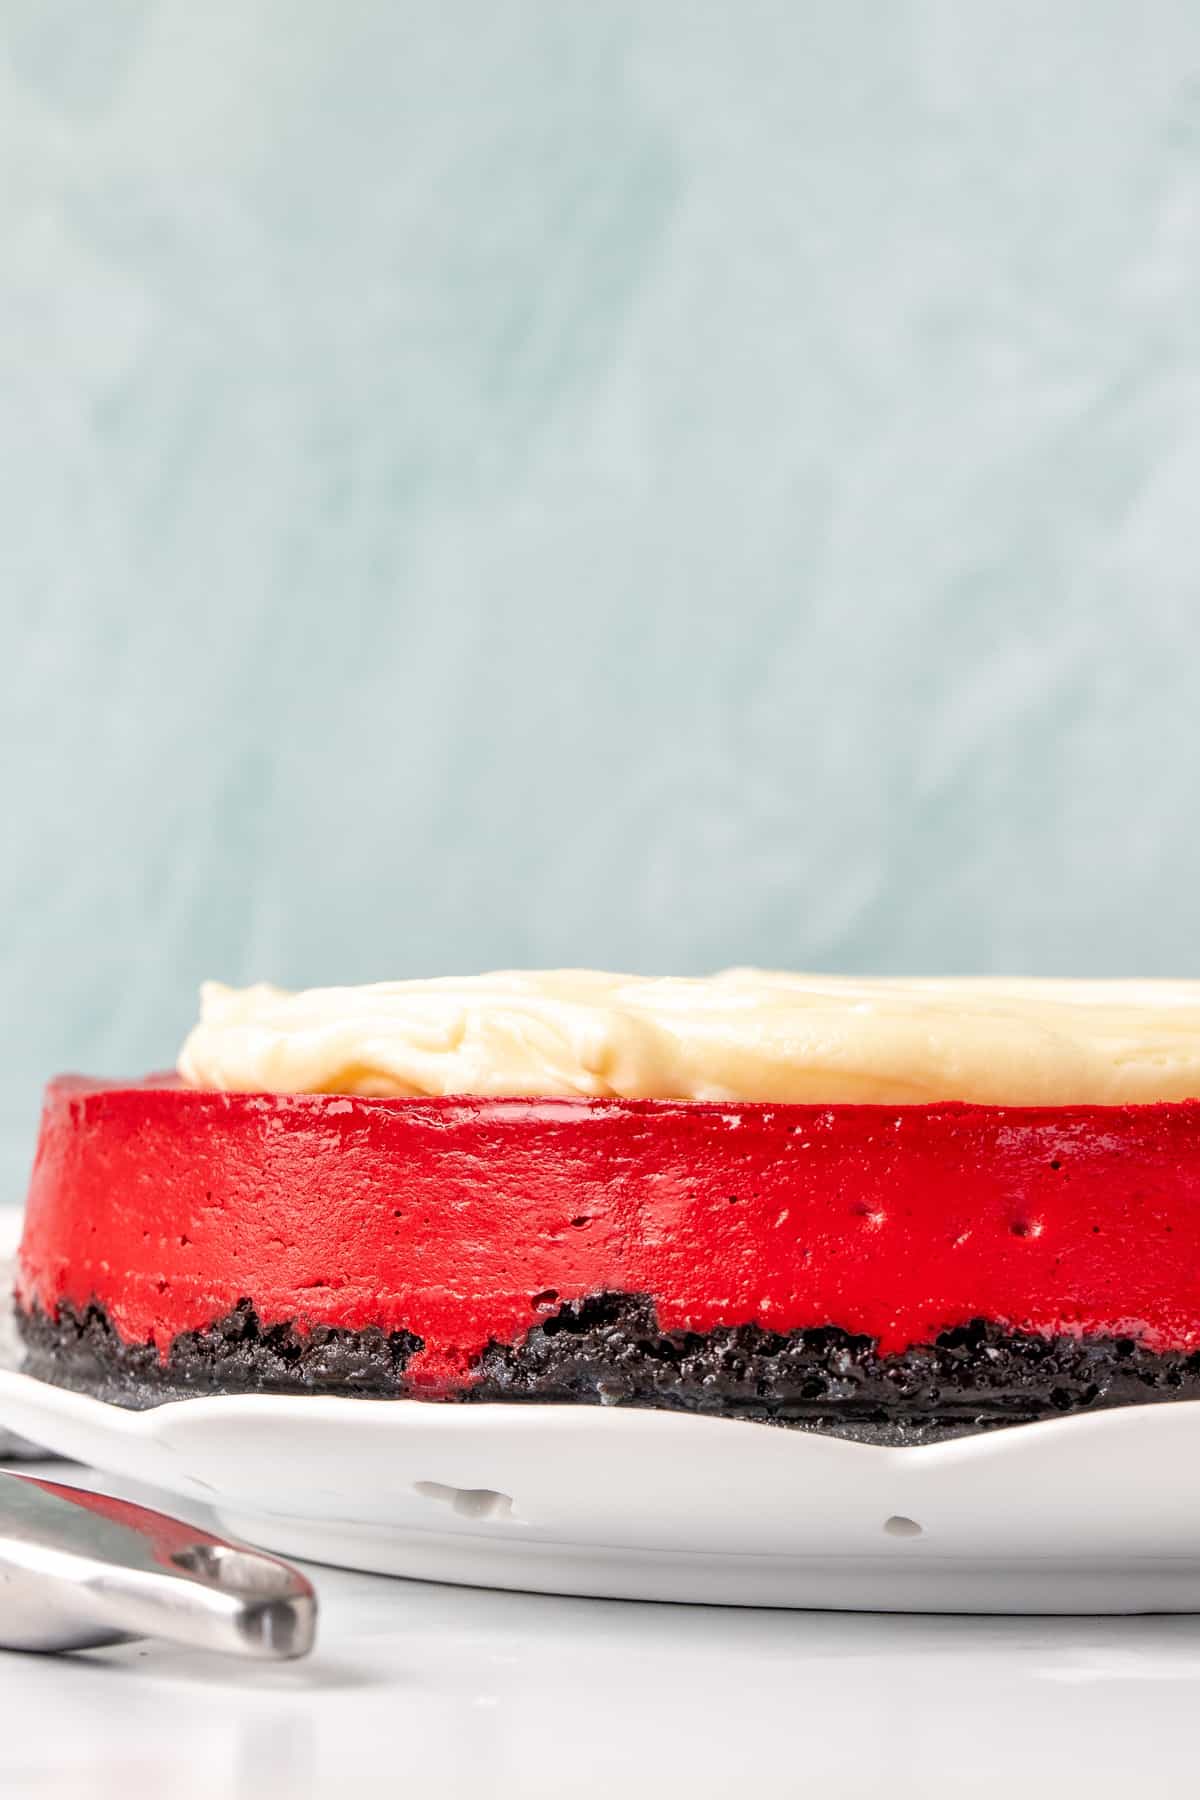
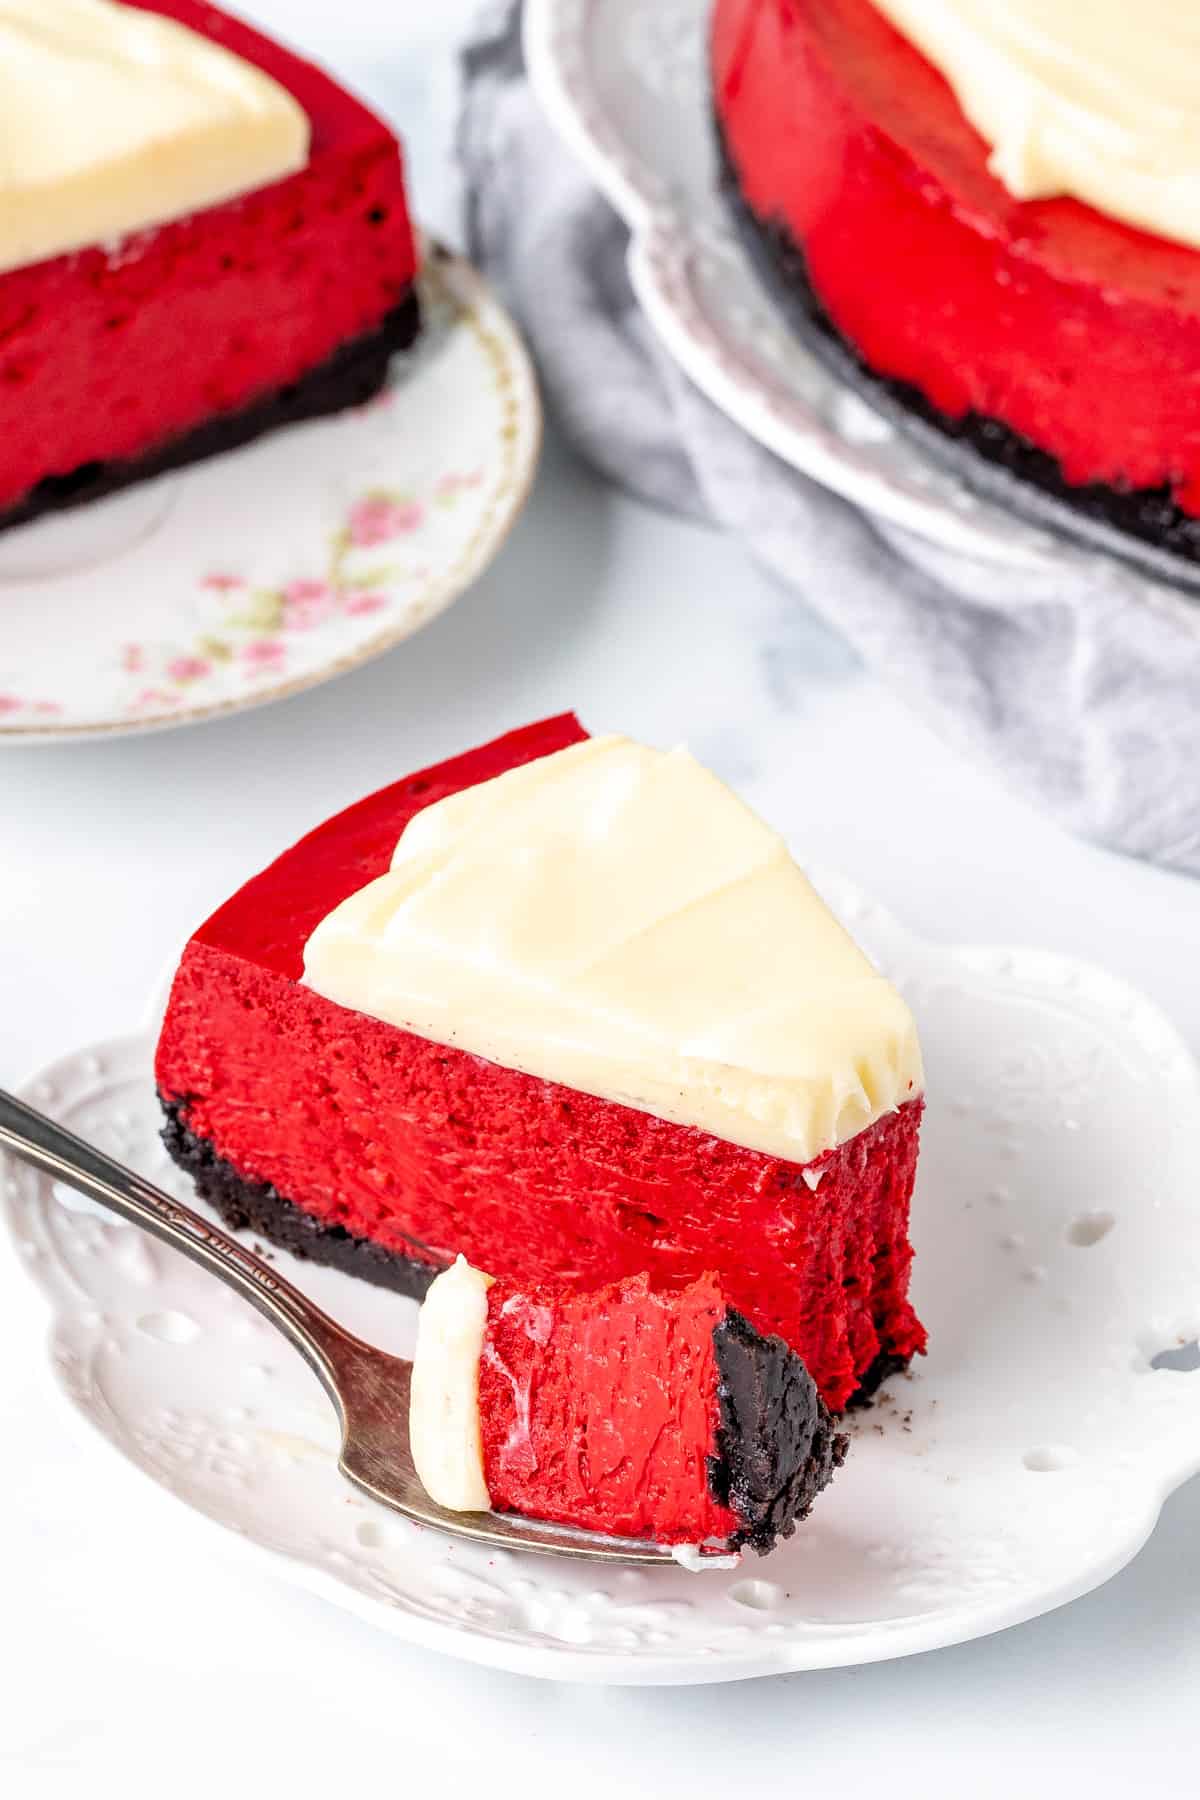
This red velvet cheesecake is a truly beautiful dessert. It has the perfect red velvet flavor, a luxuriously creamy texture and a chocolate cookie crust. Topped with tangy cream cheese frosting – you’ll amaze yourself with this restaurant-quality cheesecake. 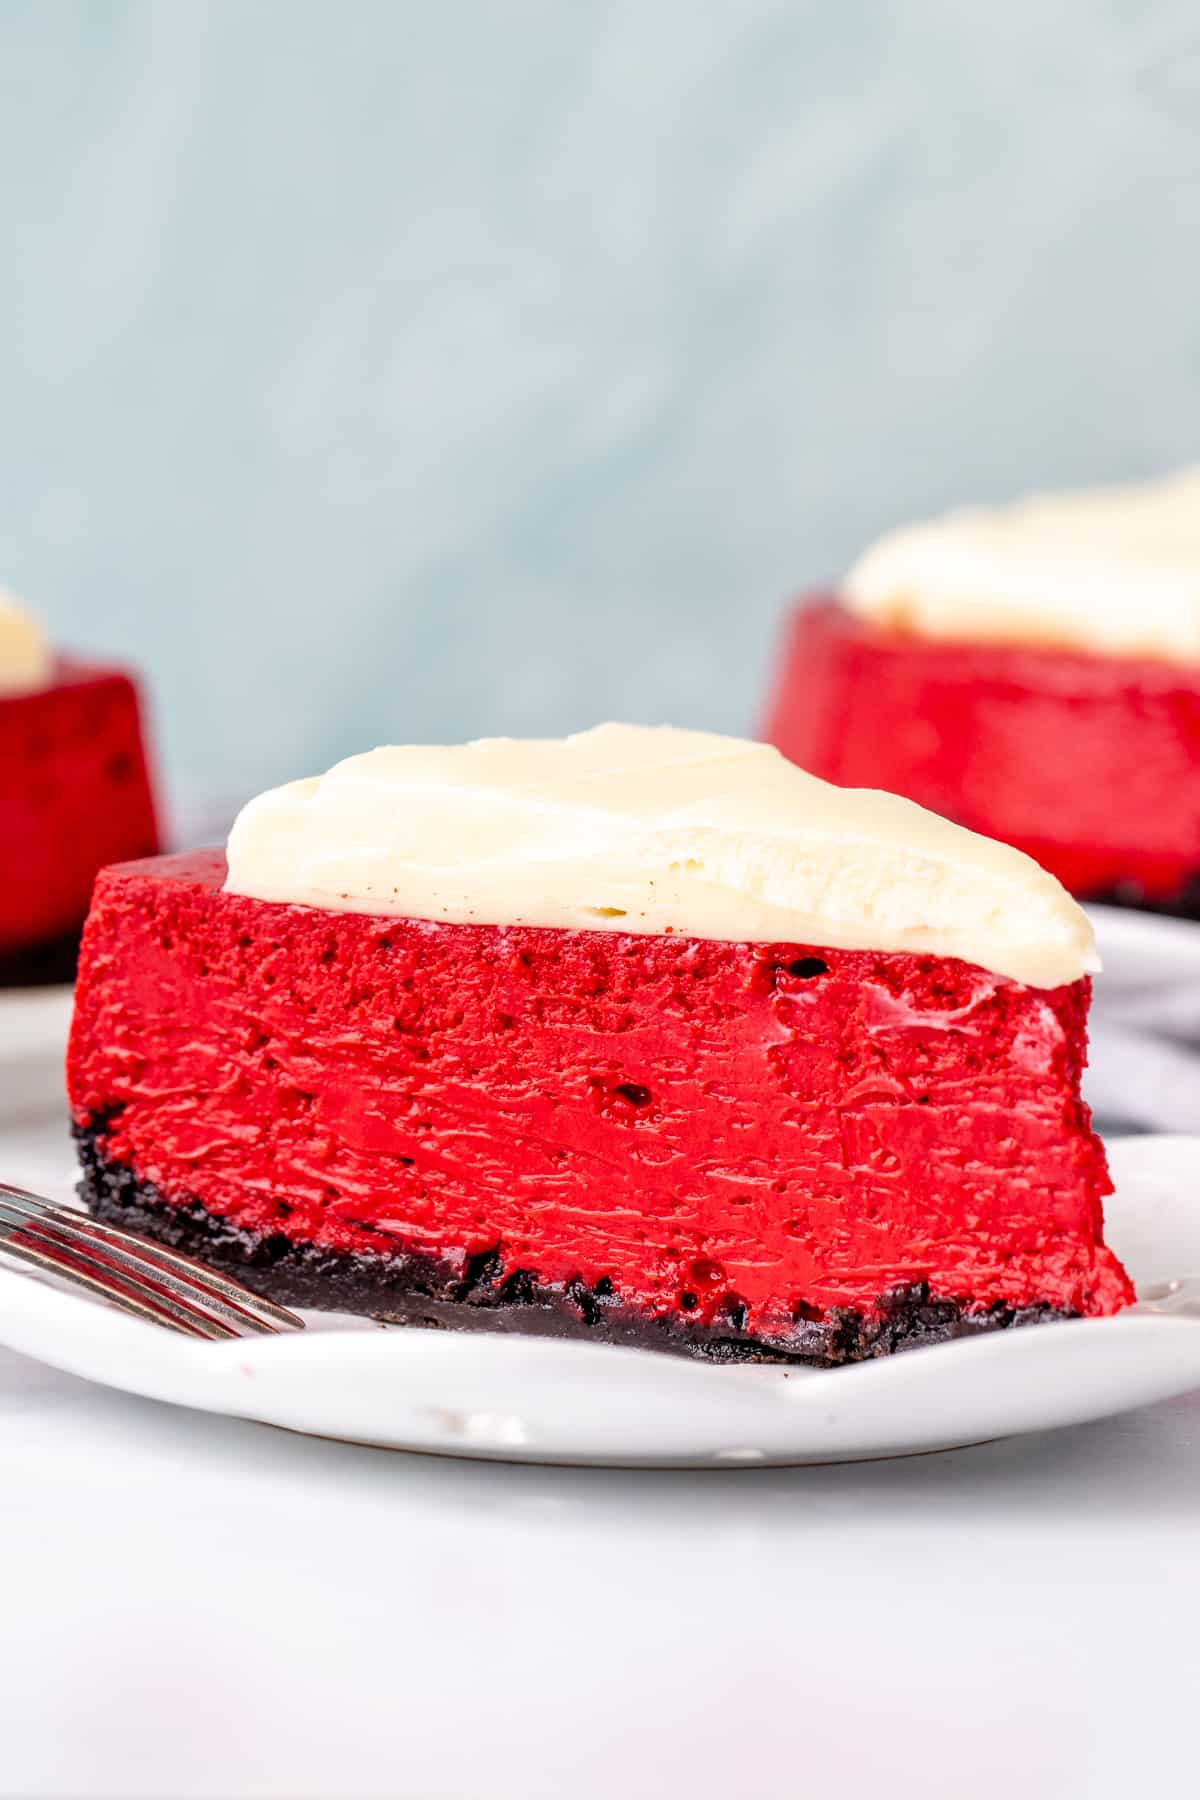
**This post was updated February 5, 2023 with new photos and recipe tips**
I’ve been playing with the idea of a red velvet cheesecake for a long time – and this recipe has everything you could want. The beautiful red color, hint of chocolate, and slight tanginess (all key characteristics of red velvet) lend themselves perfectly to cheesecake. Then an Oreo cookie crust and a cream cheese topping really take it to the next level. Because you can’t have red velvet with without cream cheese frosting. It has all the classic qualities of red velvet cake, but with the texture of the perfect New York cheesecake.
It’s luxuriously creamy in texture with the perfect red velvet flavor. Plus – there’s no fancy decorating skills required.
A Few Notes About Ingredients
The ingredients to make cheesecake are expensive – which is exactly why it’s so frustrating if the recipe doesn’t turn out. Therefore, do not substitute any ingredients, otherwise, the results can vary significantly.
- For the crust, we’re using chocolate wafer cookies. You’ll use both the wafers and the filling when you crush the cookies.
- Cream cheese should be full-fat, brick-style cream cheese. I always use Philadelphia. Light, spreadable or whipped (like the kinds that come in a tub) don’t work for making cheesecake because they aren’t thick enough or, in the case of low-fat cream cheese, can end up grainy.
- Sour cream makes the cheesecake silky smooth. Again – full-fat is the way to go. In Canada and the US, full-fat sour cream is typically about 14-18% MF – so something in this range is perfect. You want the kind of sour cream that’s sold in a tub.
- There really isn’t a substitute for buttermilk in this recipe. Plain milk is too thin and won’t provide the necessary tanginess.
- The amount of red food coloring is a little bit up to you. I used 1 1/2 tablespoons of red food coloring for the pictures shown. I recommend using gel for a more vivid color, but liquid works too.
Important: The cream cheese, sour cream and eggs must be room temperature before getting started. Take them out of the fridge, measure out the amounts, slice the cream cheese into pieces, and leave them on the counter for about 30 minutes prior to making the base. This is pertinent so that everything mixes together properly.
Baking, Chilling and Serving Red Velvet Cheesecake
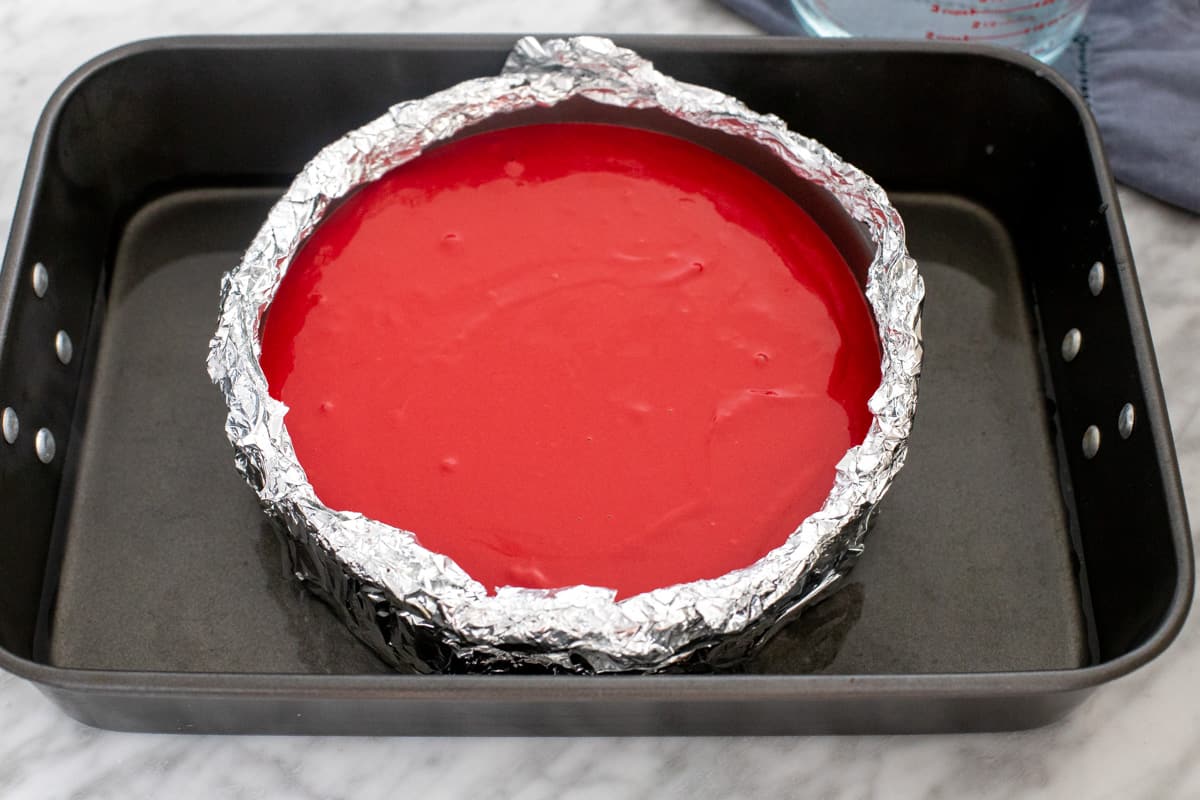
This cheesecake recipe is baked in a water bath. The water bath keeps moisture in so that the cheesecake stays creamy instead of grainy and dry. It also minimizes quick changes in temperature which can cause the cheesecake to crack. It’s like insurance for your cheesecake. To make the water bath you:
- Wrap the outside of your springform pan in aluminum foil at least 4 times so that all the edges, and all the seams are covered multiple times. (You’ll do this before making the crust).
- When you’re done making the filling, you’ll place the cheesecake pan (still wrapped in foil and with the crust prepared) in the middle of a large roasting pan. Then pour the batter over the crust and smooth the top.
- Pour about 1/2 to 1 inch (1 – 2 cm) of boiling water into the roasting pan.
- Then the whole contraption goes in the oven to bake.
How to Know When Your Cheesecake is Done Baking
This recipe will bake for about 60 minutes at 350F (180C) degrees. Ovens can vary by 10-20%. I recommend checking at 50 minutes, just in case. When it’s done baking it should look just set on top, except potentially in the very middle. If you give the pan a gentle nudge, it should still wobble in the middle like Jello or pudding, but not like a glass of milk.
The cheesecake must cool very slowly to minimize drastic changes in temperature (which can cause it to shrink and crack). Then once it fully cools, you’ll cover the pan and chill in the fridge for at least 6 hours (or overnight) for the cheesecake to set.
Serving
After the cheesecake has chilled in the fridge, a delicious, tangy cream cheese frosting goes on top. The topping isn’t quite as sweet as cream cheese frosting, but you can always adjust the amount of powdered sugar that goes into the recipe.
Typically, I’ll make the cheesecake the day before I plan to serve it, then chill in the fridge overnight. I’ll add the cream cheese topping sometime the next day, then pop it back in the fridge until I’m ready to serve.
And for more red velvet treats, don’t forget to try:

Red Velvet Cheesecake
Equipment
- 9-inch (23 cm) springform pan
- Large Roasting Pan
- Aluminum Foil
Ingredients
Cookie Crust
- 26 Oreo Cookies, wafers and filling
- 5 tablespoons unsalted butter , melted
Red Velvet Cheesecake Filling
- 24 ounces full-fat cream cheese (680 grams) , room temperature
- 1 1/4 cup granulated sugar (250 grams)
- 3 tablespoons cocoa powder
- 3/4 cup sour cream (180 ml) , room temperature
- 1/4 cup buttermilk (60 ml)
- 2 teaspoons white vinegar
- 1-2 tablespoons liquid red food coloring, gel or liquid, I used 1 1/2 tablespoons of gel
- 3 large eggs, room temperature
- 2 large egg yolks, discard the whites
- boiling water, for the water bath
Cream Cheese Topping
- 1/4 cup unsalted butter (56 grams) , softened
- 4 ounces full-fat cream cheese (112 grams), softened
- 1/4 teaspoon salt
- 1 - 1 1/2 cups powdered sugar (110 - 165 grams)
Instructions
- Preheat the oven to 350F (180C) degrees.
- Wrap the outside of a 9-inch (23 cm) springform pan with aluminum foil at least 4 times so that the bottom and sides are covered, and that all seams are covered as well.
Oreo Crust
- Place the cookies (wafers and filling) in a food processor and blitz until the cookies are fine crumbs. Or place the cookies in a freezer bag and crush with a rolling pin.
- Mix the crushed cookies with the melted butter.
- Press the mixture into the bottom of the prepared pan and slightly up the sides (about 1/4 inch) so that there's a slight lip around the edges.
- Bake in the preheated oven for 10 minutes. Then remove from the oven (keep the oven turned on).
Cheesecake Filling
- Beat the cream cheese and sugar until soft. Turn off the mixer and scrape down the sides and bottom of the bowl as necessary.
- Beat in the cocoa powder and sour cream. (If the cocoa is lumpy, be sure to sift it first). Scrape down the bowl as needed.
- With the mixer on low speed, carefully mix in the buttermilk, vanilla extract, vinegar and food coloring.
- In a small bowl, whisk the eggs and egg yolks. Then carefully beat the eggs into the batter about 1/3 at a time until just incorporated.
Baking and Cooling the Cheesecake
- Place the crust (with the pan still wrapped in aluminum foil) in the middle of a large roasting pan.
- Pour the cheesecake batter over the crust and smooth the top.
- Pour boiling water into the roasting pan so that there's about 1/2-1 inch of water (1.5 to 2.5 cm) in the roasting pan.
- Place the roasting pan (with the cheesecake inside) in the oven (still at 350F degrees from baking the crust) and bake for 60-70 minutes. When the cheesecake is done baking, it should look just set on the top, except perhaps in the very middle. If you give the pan a nudge, it should wobble in the middle like Jello or pudding. If it wobbles like a liquid, then it's not done baking yet. I recommend checking around 50 minutes, just in case.
- Remove the roasting pan from the oven and allow the cheesecake to cool fully while still in roasting pan.
- Once the cheesecake has fully cooled, remove the cheesecake from the roasting pan. Cover the pan, and place in the fridge to chill for at least 6 hours or overnight. Do not unclamp the springform pan.
Cream Cheese Topping
- Beat the butter until soft, then mix in the cream cheese.
- Add in the salt, and with the mixer on low speed beat in the powdered sugar about 1/2 cup at a time until the desired sweetness is reached.
- Top the cheesecake with the cream cheese frosting, leaving a small perimeter around the edges. Return back to the fridge until ready to serve. Note - if you take the cheesecake out of the fridge and there is condensation on top, dab with a paper towel to remove.
- When ready to serve, unclamp the outer ring of the springform pan. Slice with a sharp knife (such as a paring knife - not a table knife), ensuring that you slice all the way through the crust.
Notes
- Cream Cheese: Make sure to use full-fat, brick-style cream cheese. Do not use spreadable, whipped or light cream cheese (such as ones that come in a tub).
- Buttermilk: Unfortunately, there are really no substitutes for buttermilk in this recipe.
- Nutrition: Nutrition information is an estimate only and based on 1 slice, assuming the cheesecake is sliced into 12 equal pieces.
- Storage: Store cheesecake covered in the fridge for up to 4 days.


Question…. Can I exclude the cocoa from this recipe? I don’t like it or use it in my red velvet cake recipe. Thanks!
That would be fine as far as the recipe turning out. I’d add 2 tablespoon of cornstarch if leaving the cocoa powder out, however, as it can help to set the cheesecake
Turned out amazing! Substituted all-purpose flour with equivalent cake flour, and added orange zest to the cheesecake for subtle orange flavor.