Red Velvet Brownies
I may receive compensation in the form of payment or products to supplement my posts, but all opinions remain my own. Read our disclosure policy.

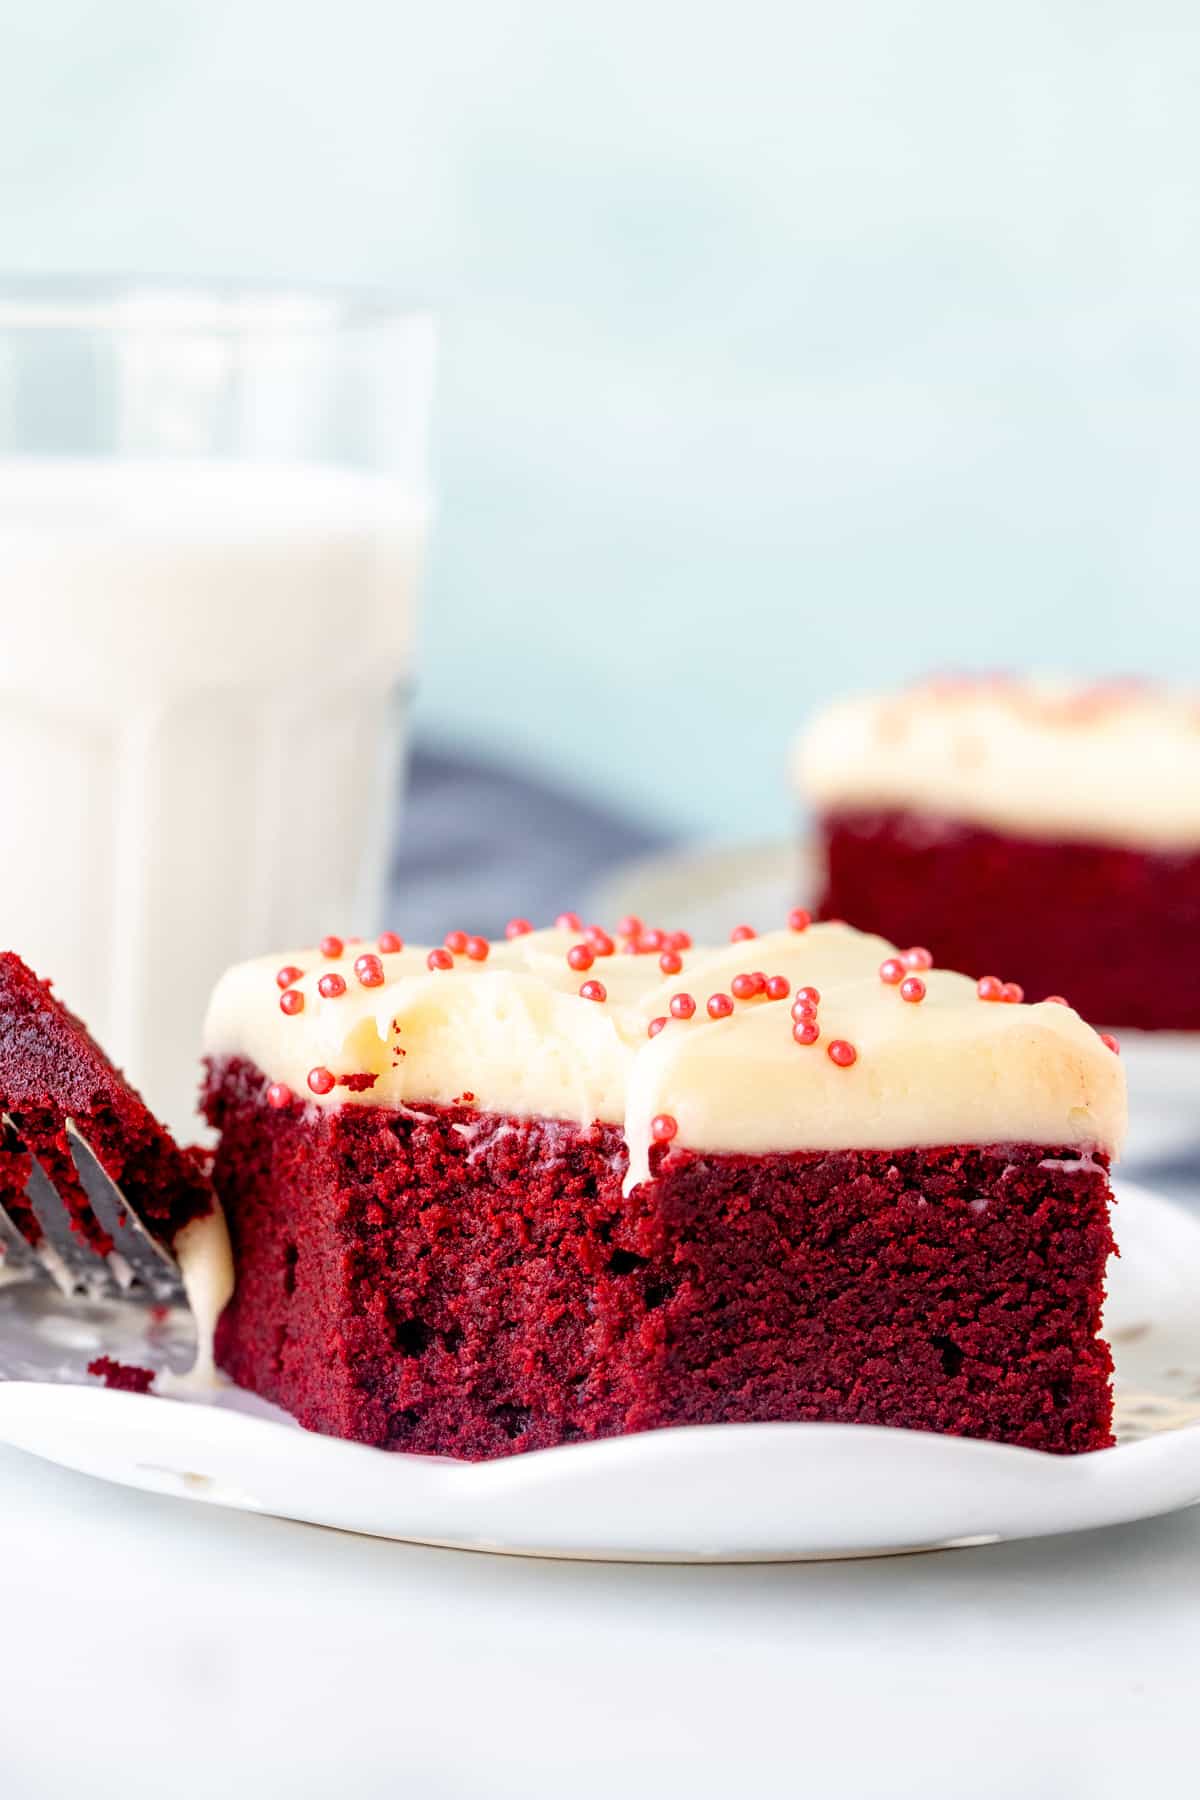
These red velvet brownies are chewy and fudgy with a delicious red velvet flavor and beautiful deep red color. They have a hint of cocoa powder – just like your favorite red velvet cake. Fill them with white chocolate chips or top with cream cheese frosting for the perfect red velvet treat. 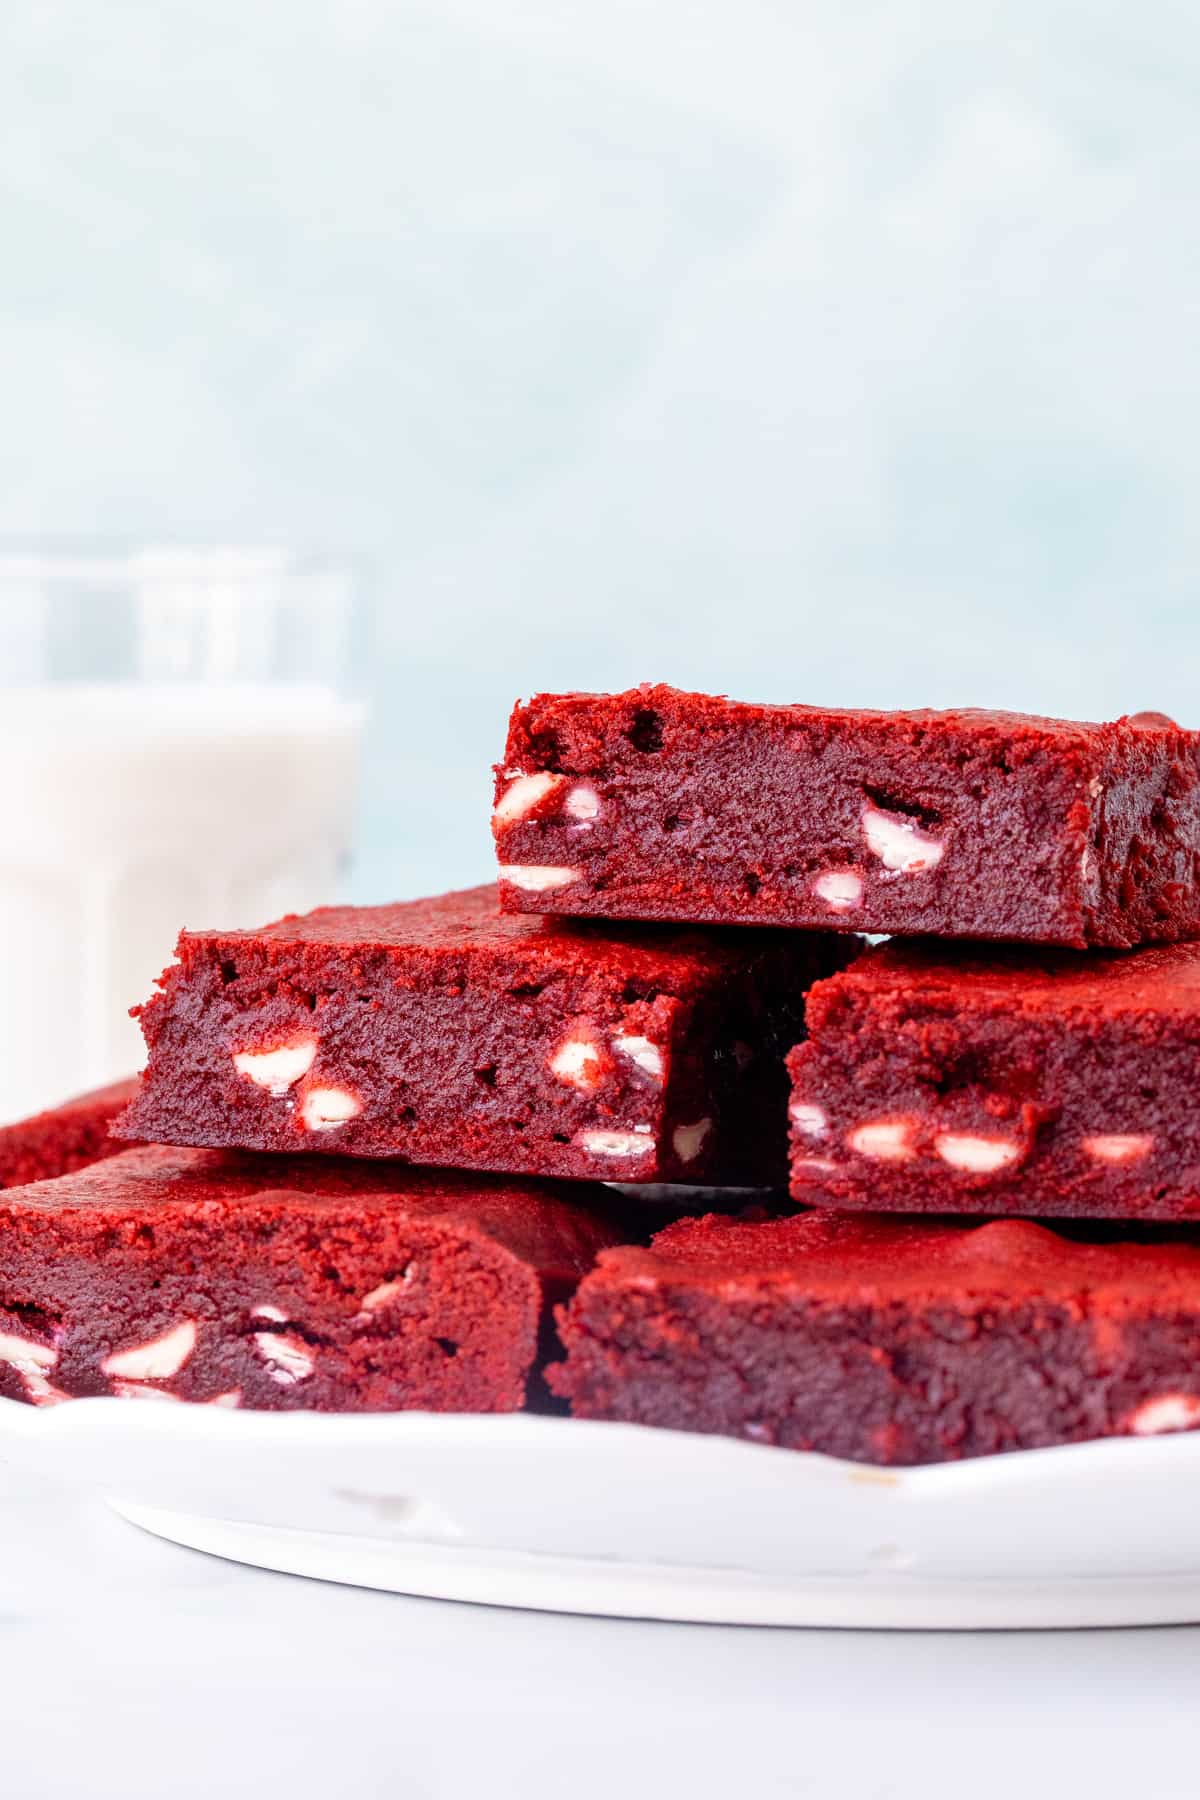
**This post was updated November 13, 2023 with new photos and a slightly updated recipe for thicker, chewier brownies**
I’m in love with everything red velvet – whether it’s a classic red velvet cake or red velvet cupcakes. So it was only a matter of time before making red velvet brownies. These are moist, chewy, and dense with the perfect brownie texture and the same red velvet flavor that you love. Sometimes I like to fill them with white chocolate chips. Sometimes I frost them with a thick layer of tangy cream cheese frosting. Either way, they’re incredible.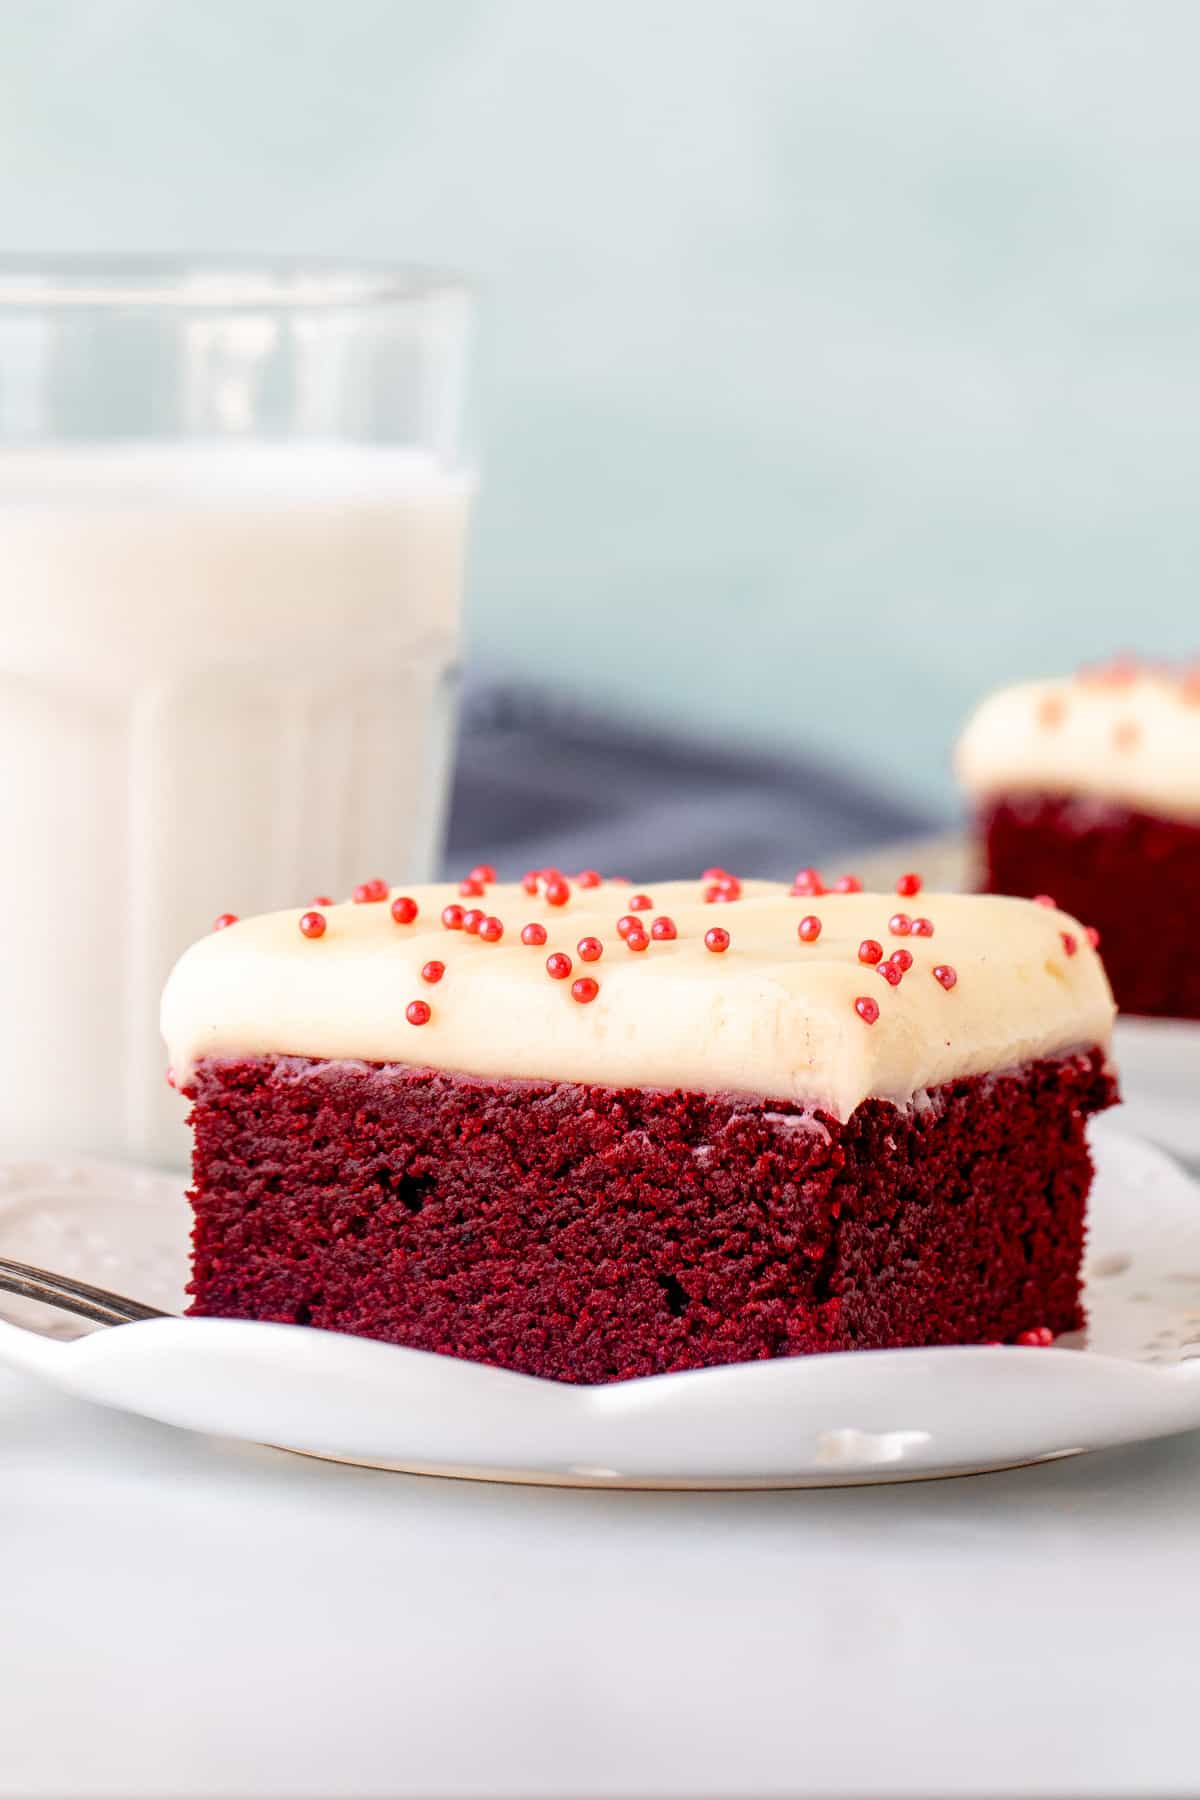
The Perfect Red Velvet Brownies
Red velvet is somewhere in between chocolate and vanilla in flavor – so I based this recipe off my favorite homemade brownies and my blondie recipe. They’re moist and dense – just like you’d expect from a brownie.
I’ve included step-by-step photos and recipe tips below to help you get the perfect red velvet brownies. As always, feel free to scroll down to the condensed recipe.
- Start by preheating the oven to 350F (180C) and preparing your pan. I always prefer to line my pan with parchment so that there’s an overhang around the edges. Alternatively, you can lightly grease the pan. This recipe is designed for an 8×8 inch (20×20 cm) pan.
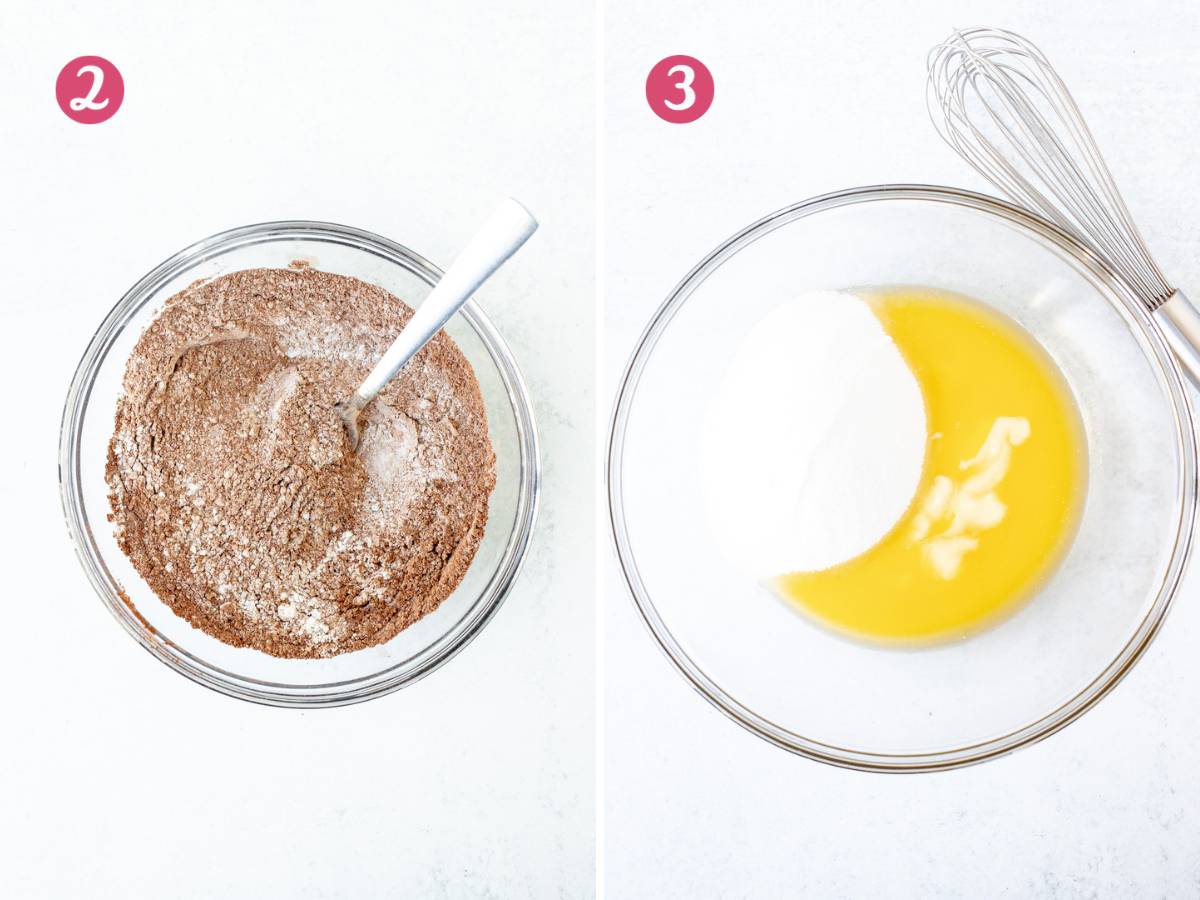
- Whisk together the dry ingredients in a medium bowl – flour, cocoa, cornstarch (AKA cornflour) and salt. You’ll notice that there isn’t as much cocoa powder in this recipe compared to traditional brownies. The cornstarch helps to give the brownies the perfect texture. Once I made this addition to my brownie recipes, I’ve been so happy with the results. Set aside.
- In a large bowl, whisk together the melted butter and granulated sugar. These brownies are developed using melted butter. The butter adds so much more flavor than using oil, and the using melted butter creates a chewier, more dense brownie texture.

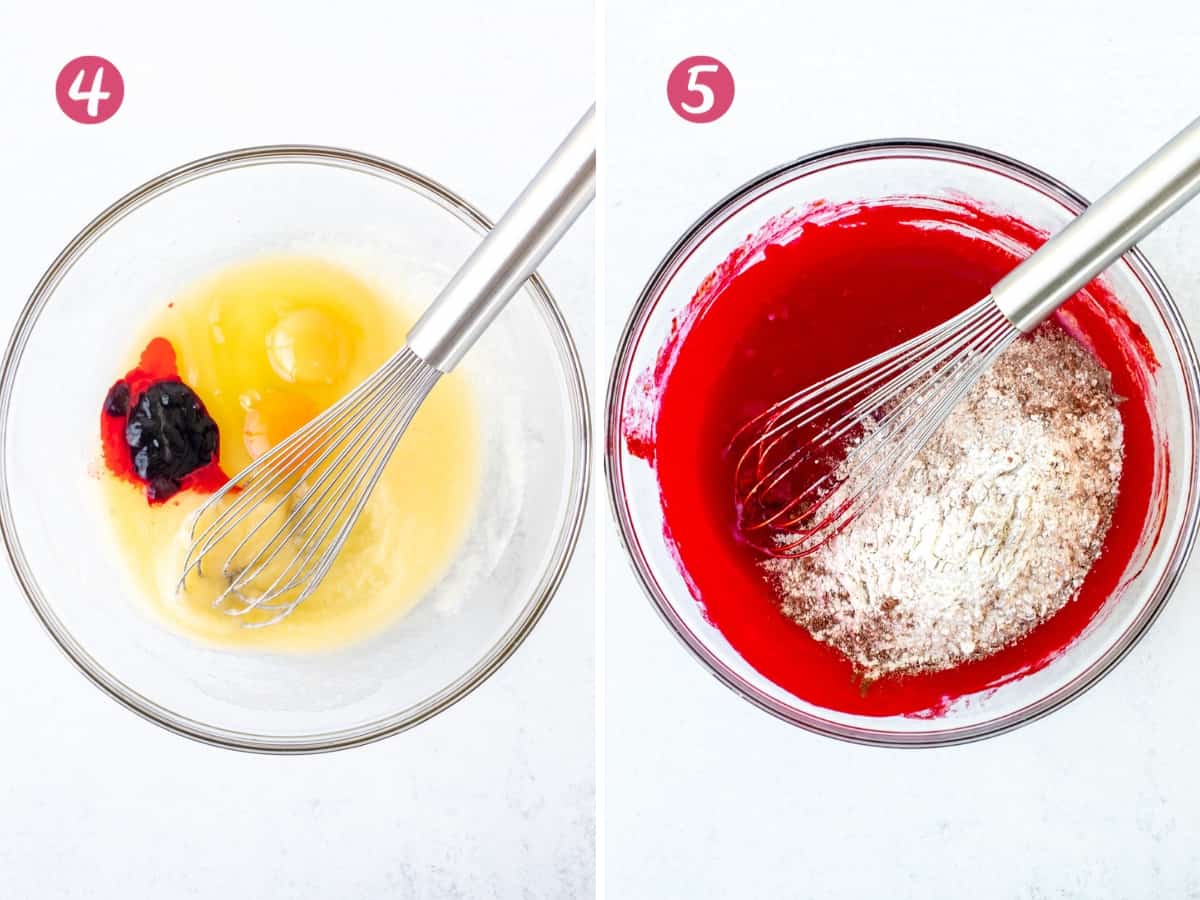
- Then you’ll whisk in the eggs, red food coloring, vanilla extract and a little vinegar. For the red food coloring, I like to use gel because it’s more concentrated and therefore doesn’t add as much liquid to your batter compared to using liquid. Liquid will work too though. The vinegar is key in red velvet because it creates a slight tanginess.
- Carefully mix the dry ingredients into the wet ingredients. If you notice that the dry ingredients are a bit lumpy, then be sure to sift them in. Make sure to stop mixing as soon as you no longer see lumps or streaks of flour in the batter.
- If you’re adding in white chocolate chips, gently fold them into the batter.
- Then spoon the batter into your prepared pan and smooth the top.
- The brownies will bake in the preheated oven for about 26-30 minutes or until the tops look set and an inserted toothpick comes out clean or with a few damp crumbs.
Pro Tip: Bake time will depend on your oven and how gooey you like your brownies. If you plan to frost these with cream cheese frosting, I bake them a little longer because I don’t love super gooey brownies with frosting. If you bake the brownies slightly longer they will also be a little cakier and thicker. If I’m filling them with chocolate chips and not frosting, I’ll take them out a minute earlier for gooier, denser and slightly thinner brownies.
For the photographs, I made 2 batches of brownies – one with chocolate chips and one with frosting. You can see that the frosted brownies are slightly thicker, whereas the brownies with chocolate chips are definitely gooier.

The brownies will need to cool fully before slicing or frosting. Cooling the brownies fully before slicing will give you nice clean cuts. If the brownies are still warm when you frost them, the frosting will melt.
The cream cheese frosting is a simple, straight forward, perfectly creamy recipe. Whenever making cream cheese frosting, make sure to use full-fat, brick-style cream cheese. Never use anything that comes in a tub or is labeled spreadable, whipped, low calorie or low fat. All of these versions are too thin for making frosting. The frosting is thick, creamy and the perfect topping if you prefer your brownies a little chewier as opposed to gooier.
But however you choose to top your brownies – plain or with cream cheese frosting – these red velvet brownies are perfect.
And if you’re in the mood for more red velvet recipes – be sure to try this red velvet cookie cake, these homemade red velvet Oreos, or this red velvet bundt cake

Red Velvet Brownies
Equipment
- 8x8 inch (20x20 cm) pan
Ingredients
Red Velvet Brownies
- 1 1/4 cup all-purpose flour (156 grams)
- 3 tablespoons cocoa powder (17 grams)
- 1 tablespoon cornstarch , AKA cornflour
- 1/4 teaspoon salt
- 3/4 cup unsalted butter (168 grams), melted and cooled slightly
- 1 1/4 cup granulated sugar (250 grams)
- 2 large eggs, room temperature
- 1 teaspoon vanilla extract (5 ml)
- 1 tablespoon red food coloring (15 ml) , gel or liquid, feel free to use more or less
- 1 teaspoon white vinegar (5 ml)
- 1 cup white chocolate chips (180 grams) , optional
Cream Cheese Frosting
- 1/4 cup unsalted butter (56 grams) , softened to room temperature
- 4 ounces full-fat cream cheese (112 grams) , cut into cubes
- 1 1/2 - 2 cups powdered sugar (165 - 220 grams) , sifted, if needed
- 1 teaspoon vanilla extract
- 1/4 teaspoon salt
- 1 tablespoon whipping cream, if needed
Instructions
Red Velvet Brownies
- Preheat the oven to 350F degrees (180C) and line an 8x8 inch (20x20 cm) pan with parchment paper so that there's an overhang around the edges. Alternatively, lightly grease the pan.
- In a medium bowl, whisk together the flour, cocoa, cornstarch and salt. Set aside.
- In a separate large bowl, whisk together the melted butter and sugar until you no longer see the butter sitting on top of the sugar.
- Whisk in the eggs, red food coloring, vanilla extract and vinegar until smooth and you no lo longer see pieces of egg.
- Gently whisk the flour mixture into the wet ingredients. Do this by hand. Stop mixing when you no longer see streaks or lumps of dry ingredients.
- Optionally, stir in the chocolate chips.
- Pour the batter into the prepared pan and bake for 28-32 minutes, or until an inserted toothpick comes out clean or with a few damp crumbs. If you plan to frost the brownies, I recommend baking them closer to 30-32 minutes so that they aren't too gooey. They will still be chewy and moist.
- Cool the brownies in the pan until the pan is no longer warm to the touch.
- If frosting, see below. If not frosting, lift the brownies out of the pan using the overhang of the parchment paper. Place on a cutting board and slice with a sharp knife.
Cream Cheese Frosting
- In a medium bowl, beat the butter until smooth.
- Then add in the chopped cream cheese and beat until smooth.
- Add in 1 cup of the powdered sugar along with the vanilla and salt. Mix together starting with the mixer on a low speed.
- Beat in the rest of the powdered sugar about 1/4 cup at a time until the desired sweetness is reached. If you'd like the frosting to be a little thinner or a little less sweet, beat in 1 tablespoon of cream (you may not need any cream).
- If you lined the pan with parchment, lift the cooled brownies out the pan using the overhang and place on a cutting board.
- Frost the cooled brownies using a flat edge knife (either in the pan if you just greased the pan or on the cutting board). Optionally, decorate with sprinkles. Slice using a sharp knife.
Notes
- Cocoa: I used natural cocoa for this recipe, but Dutch process will work as well.
- Flour: Measure carefully to ensure your brownies aren't dry. Whisk first, then spoon into a dry measuring cup and level off the top. Using a scale and measuring in grams helps to ensure accurate measurements.
- Red Food Coloring: Liquid or gel will work, I prefer gel because it's more concentrated. Feel free to use less or more, depending on how strong of a red color you want your brownies to have.
- Doubling the Recipe: This recipe can be doubled and made in a 9x13 inch (23x33 cm) pan. The brownies will be thicker and therefore the bake time will be longer. I'd say about 32-37 minutes.
- Store and Make-Ahead Details: Store unfrosted brownies in an airtight container at room temperature for up to 4 days. Store frosted brownies in an airtight container for up to 4 days. Baked and cooled brownies (without frosting) can be frozen for up to 2 months. Wrap tightly then place in a freezer bag or freezer container. Thaw in the fridge.
- Nutrition: Details provided are an estimate only and based on 1 brownies topped with cream cheese frosting without white chocolate chips, assuming the pan is sliced into 12 uniform brownies.


First time trying this recipe. As usual i reduced the amount of sugar and they’re real good. Thankyou Fiona for the delicious recipe 🫶🏻
On a whim I chose this recipe and they came out spectacular. Just what I needed to satisfy my chocolate AND red velvet craving. MY 2 fave desserts in one. I don’t think my plan was 8×8,but they were delightful. I used 3 Lindor white chocolate candies, cut them in half, making 9 pieces, equally spread apart. I was out of vanilla, so I used almond extract and it smells splendid. Very easy to make and this will be my go to recipe from now on. Thank you!
My daughter and I originally found this recipe last Valentine’s Day because we wanted to make a family dessert. Oh my sweet lord these are good! We’ve made them a few times since and are gearing up to make them for Valentine’s day tomorrow. Just wanted to let you know how wonderful we think these are. The only adjustment we’ve had to make (because our oven is wonky) is bake them for slightly less time than recommended. Otherwise, they’re perfect!
Thank you so much Shelley! Happy Valentine’s Day!
Love it!!!
Great Recipe, Thks u so much for sharing. 👏🏾
This recipe doesn’t have as many reviews as it deserves so I figured I better leave one! These red velvet brownies turn out WONDERFUL! They’re perfectly dense and chewy, just how I was hoping. The first time I made them, I actually made them again right away after finishing the first pan, haha, because they were so good and I was so impressed. They’re now one of my regular go-to recipes!
More cake than brownie. They tasted good, but that’s all on Betty crocker. Gonna try another website for an actual brownie recipe.
Can I use brown sugar instead of white?
Made this recipe for my dad on Father’s Day and he LOVED IT. My whole family raves about them. They are the perfect texture, flavor and amount. Saved this recipe for the future!!
Yay! I hope your Dad had a wonderful day
How has this recipe now had amazing reviews yet? I made these red velvet brownies exactly as the recipe states and they turned out, AMAZING. The entire batch only lasted a few hours. Family liked them when they’re warm and gooey but I loved them even more after they’d cooked and been sat for a bit to firm up. These are now a firm favourite of mine and I’ll make them again and again! Thanks so much for sharing this wonderful recipe!