Red Velvet Cookie Cake
I may receive compensation in the form of payment or products to supplement my posts, but all opinions remain my own. Read our disclosure policy.

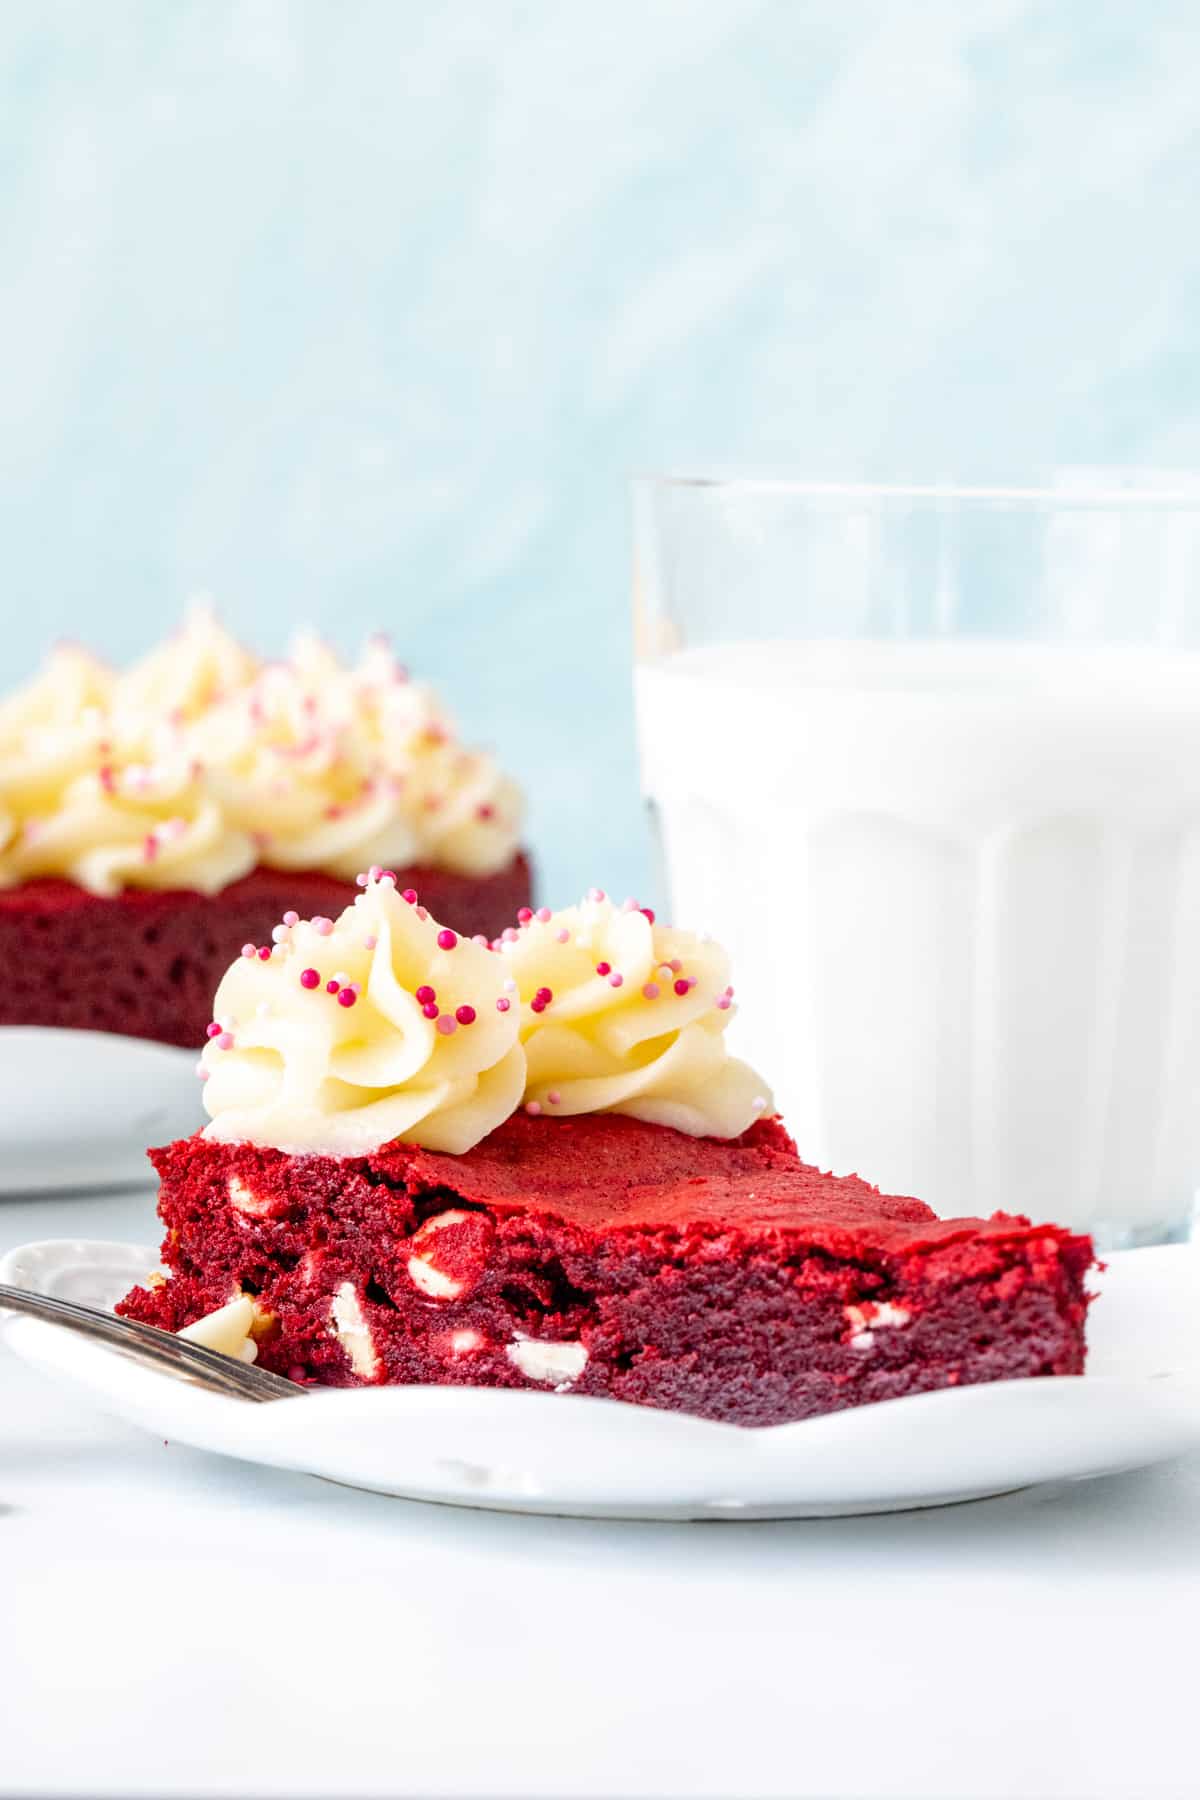
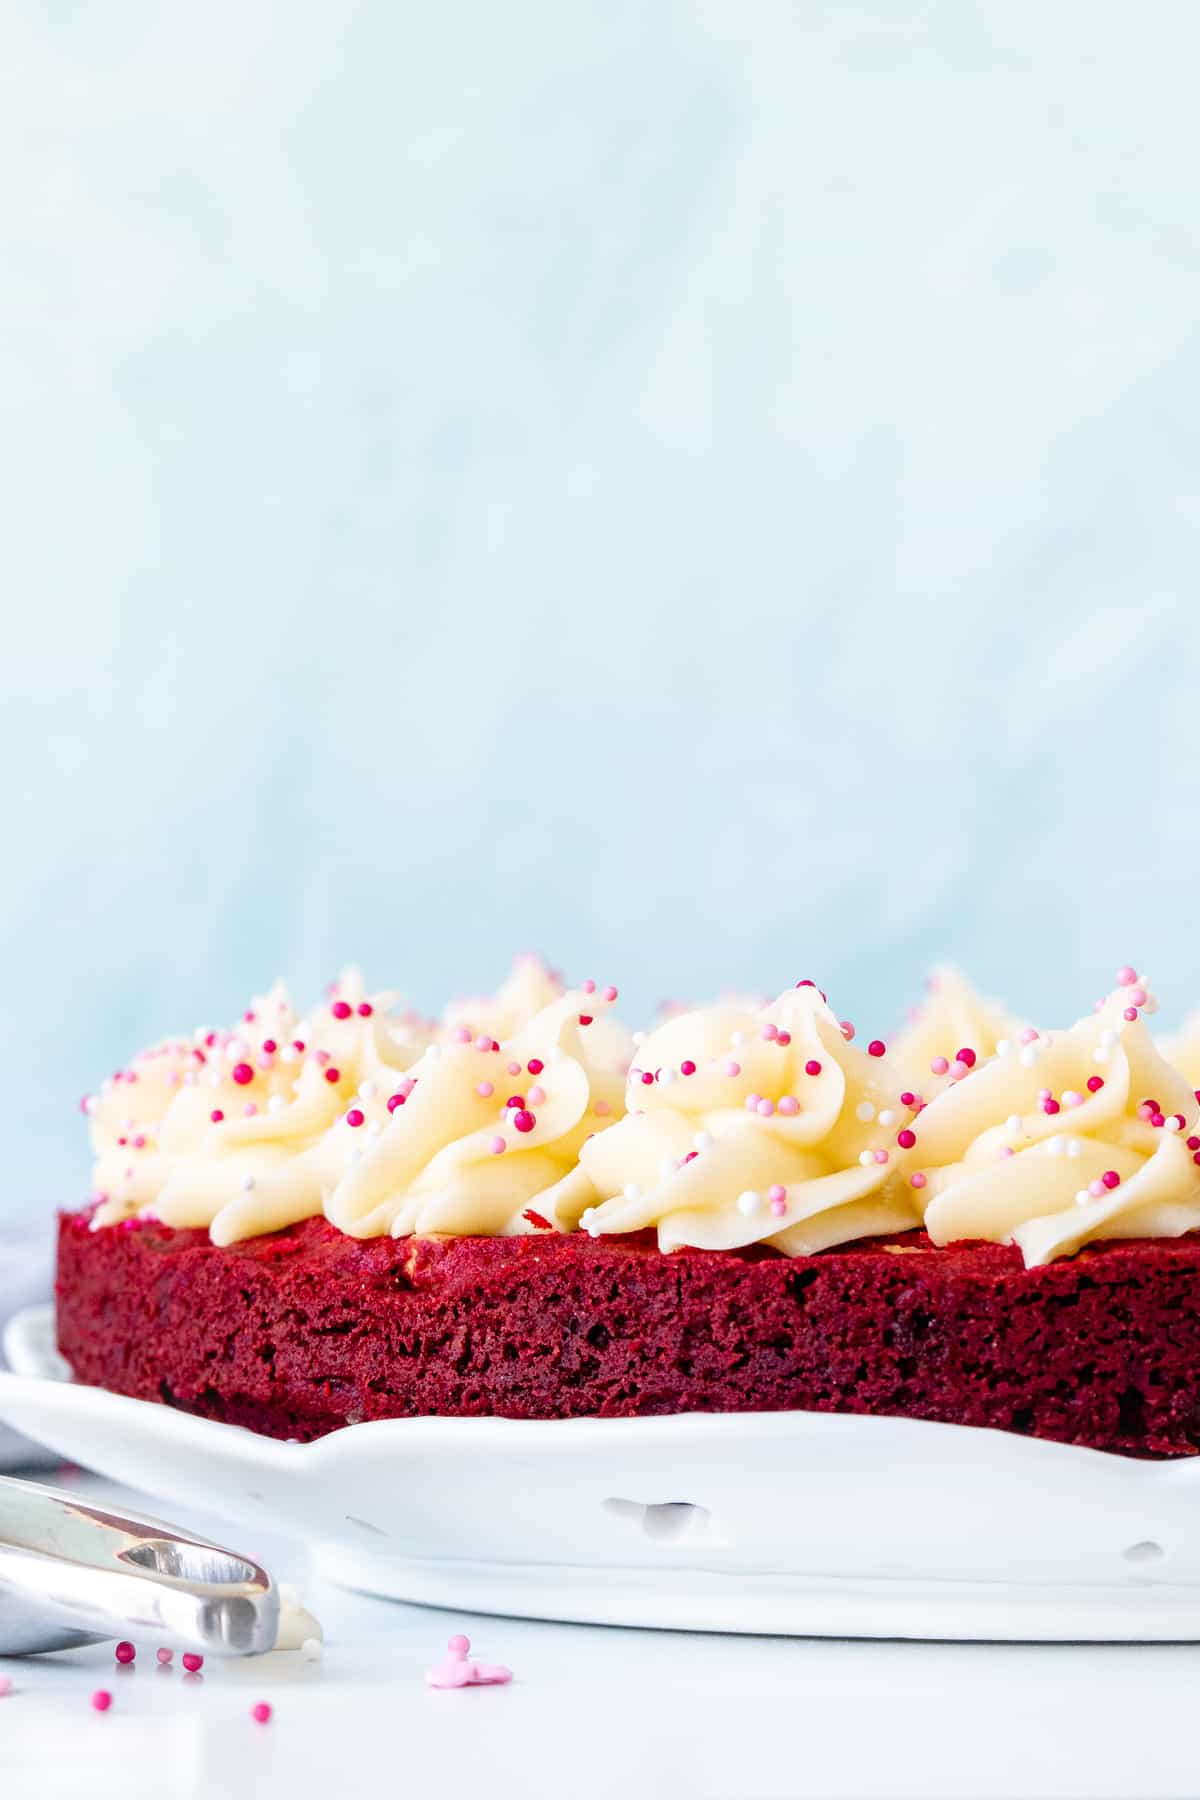
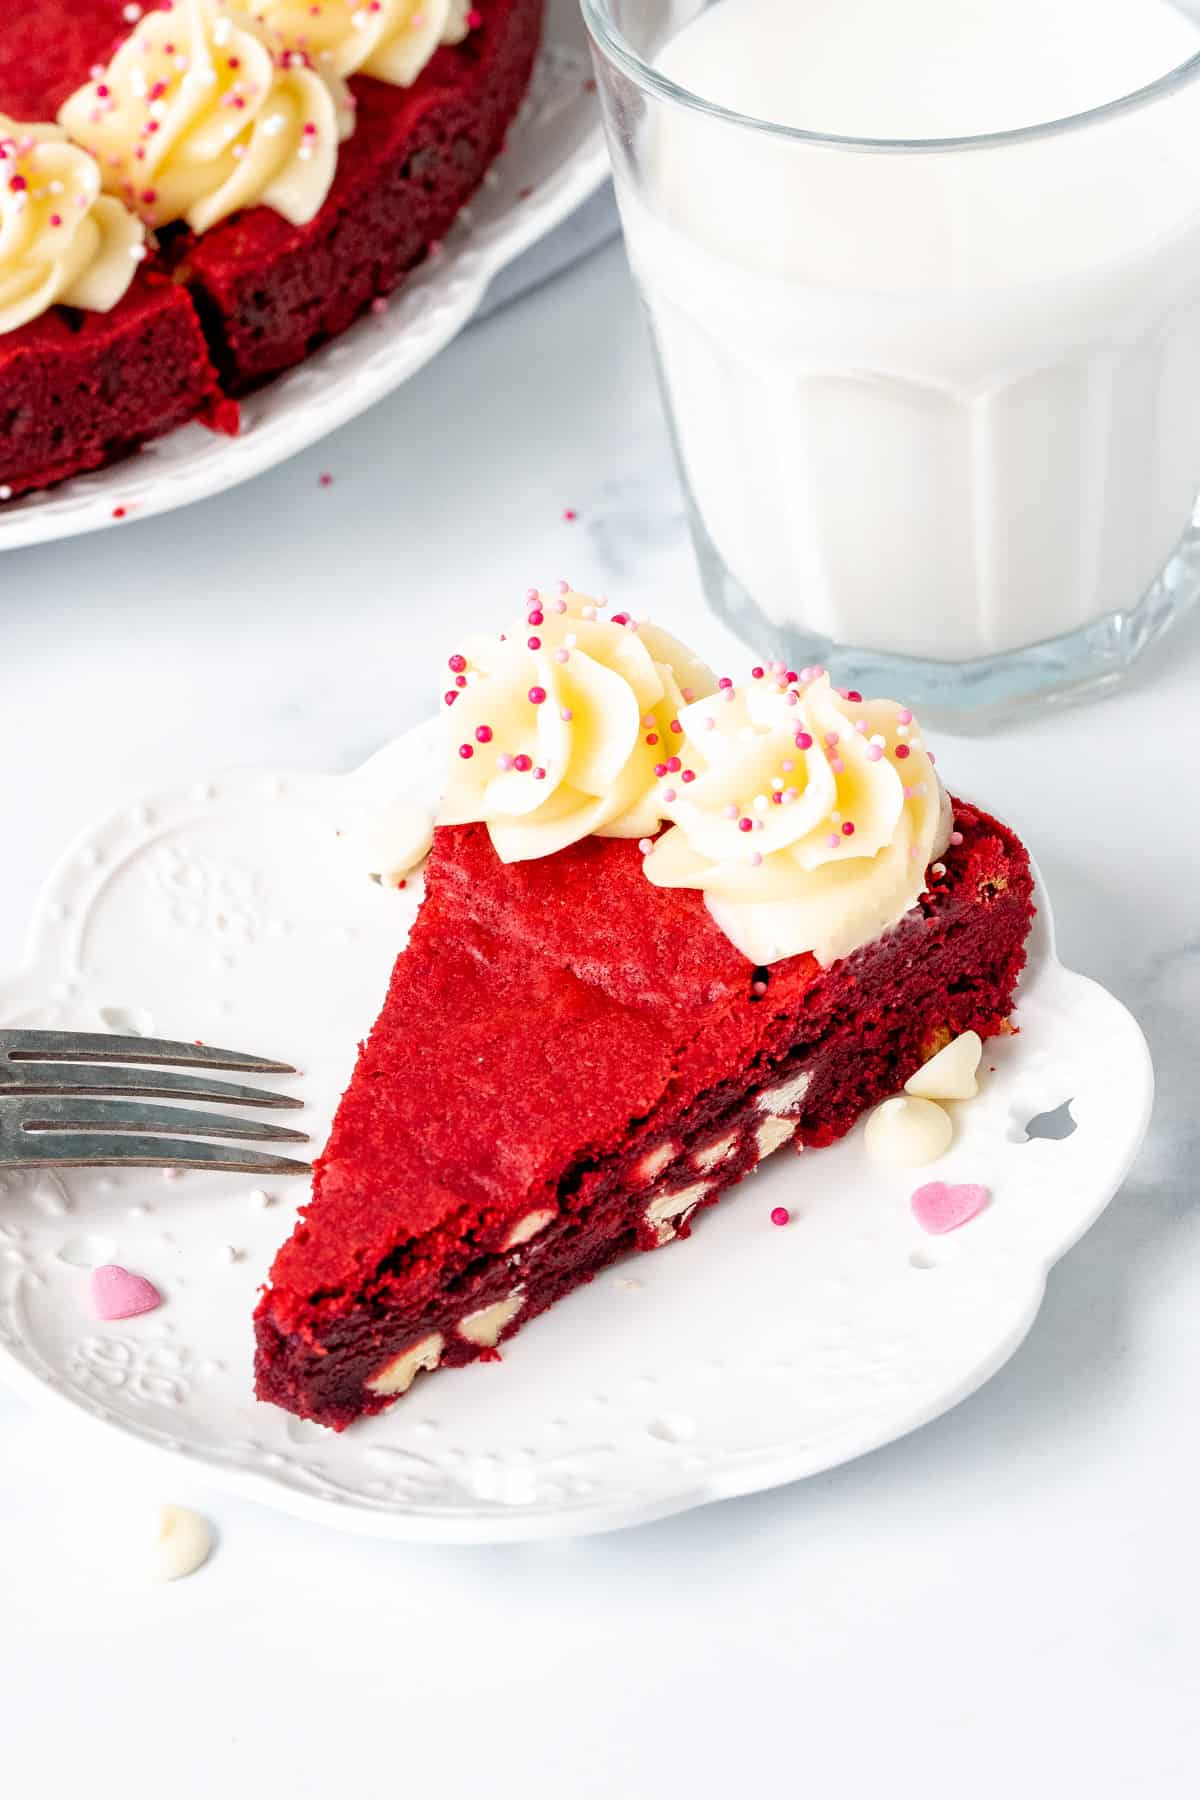
This GIANT Red Velvet Cookie Cake has a delicious red velvet flavor, beautiful red color, and a soft and chewy texture. It’s filled with white chocolate chips and decorated with cream cheese frosting. It looks beautiful and makes for the perfect dessert for cookie lovers!
**This post was updated January 29, 2023 with new photos and a slightly updated recipe after many readers found that the bake time was off in the original recipe**
Why Make this Red Velvet Cookie Cake?
This red velvet cookie cake is the perfect dessert if you love red velvet cake, but want something a little easier to make. It’s thick and chewy with a delicious red velvet flavor and tons of chocolate chips. Then piping cream cheese frosting around the edges adds an extra touch of deliciousness. I love a giant cookie cake – and this red velvet version is perfect for Valentine’s Day.
Making the Cookie Cake
This red velvet cookie cake is very straight forward to make. For recipe tips, be sure to keep reading. To get straight to the recipe (without tips, tricks, photos & advice), feel free to scroll down.
- As (almost) always, you’ll start by preheating the oven to 350F (180C) and preparing the pan. This recipe can be made in a 9-inch springform pan or a 9-inch pie plate. If using a springform pan, I line the bottom with parchment paper and lightly grease the sides. If using a pie plate, then I’d simply grease the pan.
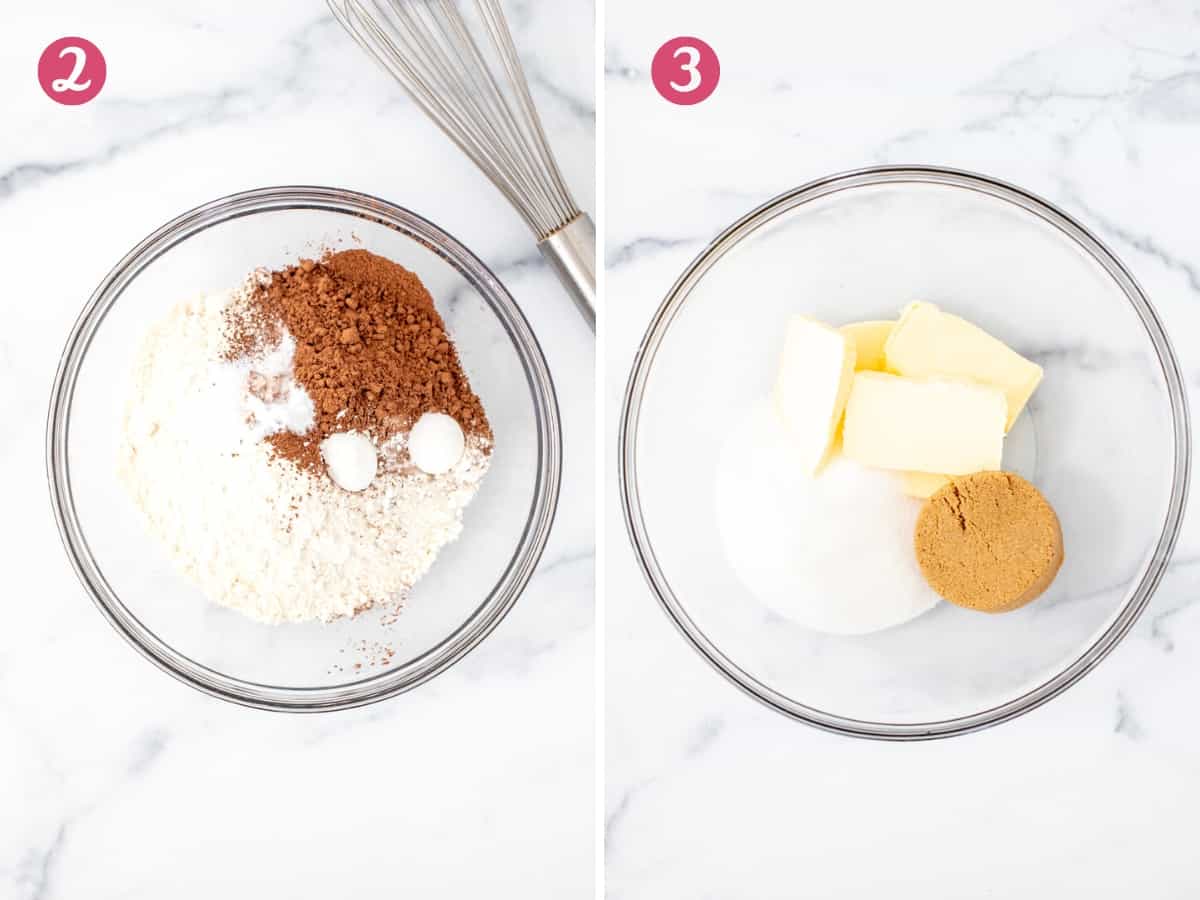
- In a medium bowl, you’ll whisk together the flour, cocoa, cornstarch, baking soda and salt. Just a touch of cocoa is key for the red velvet flavor, then the cornstarch helps to make cookies soft and chewy.
- Then in a separate bowl beat together the softened butter, granulated sugar and brown sugar. The butter should be softened but not starting to melt. Note that melted butter vs softened butter perform differently in baking, so be sure that the butter is only softened.

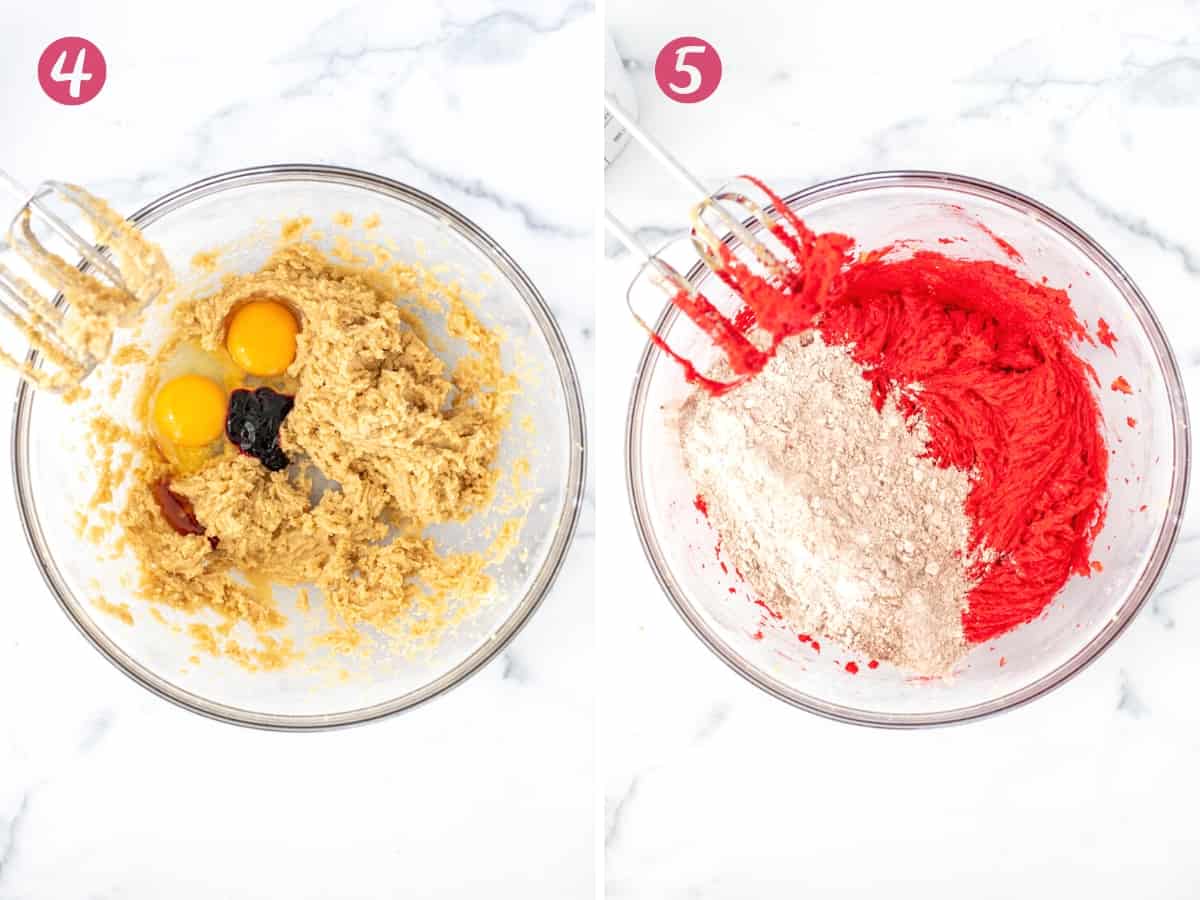
- Then you’ll beat in 1 egg plus 1 additional egg yolk, the vanilla extract and food coloring. The additional egg yolk makes the cookie cake extra chewy. You can either use gel or liquid food coloring. I used gel for a more intense color. Note that after this step the the batter will look quite neon, but it will mellow after adding in the dry ingredients.
- From there, beat the dry ingredients into the butter mixture. You may want to do this about 1/2 at a time to avoid the dry ingredients flying everywhere when you turn on the mixer. You’ll see that the color will darken and mellow after this step.
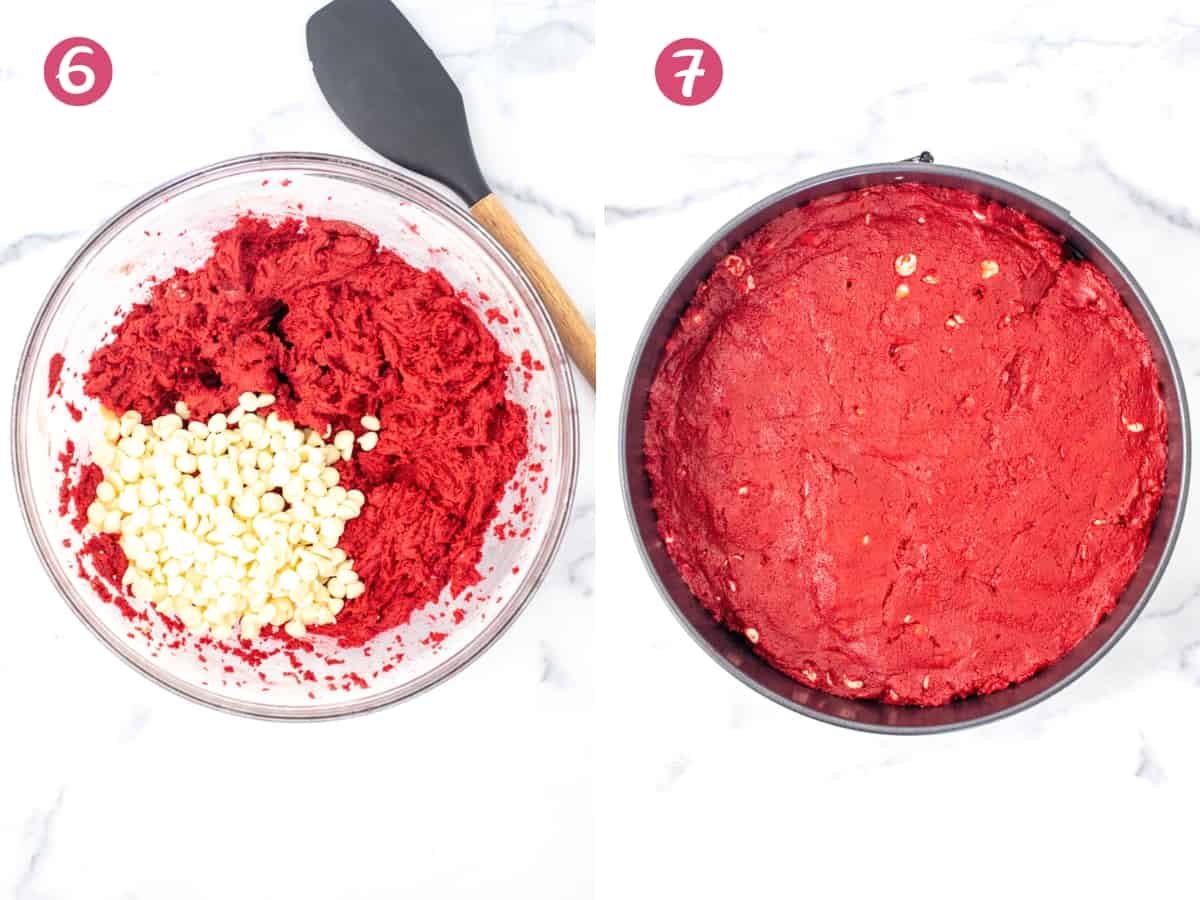
- Then stir in the chocolate chips. I always use white chocolate chips, but any type will be delicious.
- From there, spoon the batter into the prepared pan and spread into an even layer. I often use a piece of wax paper to push the dough down into an even layer – just make sure to remove the wax paper before baking.
- Bake the cookie cake in the preheated oven for about 30 minutes, or until the top looks set and an inserted toothpick comes out clean or with a few cookie crumbs. If you give the pan a gentle nudge, it shouldn’t wobble in the middle.
After the cake is fully cooled, cream cheese frosting is piped around the edges of our cake. After all, you can’t have red velvet without cream cheese frosting. There’s a little extra frosting if you’d like to write a special message on your cookie cake too. It’s also delicious with a scoop of vanilla ice cream if you want to skip the frosting.
Make Ahead Tips: Because the cookie cake will need to cool fully before decorating with frosting – I typically make the cake the day before I plan to serve it. Let it cool fully, then cover and store at room temperature overnight. Then I’ll make the frosting and decorate the day I plan to serve.
Soft and chewy with the perfect red velvet flavor – this red velvet cookie cake is truly divine. Note that because this recipe was designed for making a cookie cake, if you’re looking to make red velvet cookies, then I recommend this red velvet cookie recipe. Or for more red velvet recipes, be sure to try:
- Red Velvet Cupcakes
- Red Velvet Brownies – if you want something a little gooier
- Red Velvet Oreo Cheesecake – for a truly decadent red velvet dessert

Red Velvet Cookie Cake
Equipment
- 9-inch springform pan or 9-inch pie plate
Ingredients
Red Velvet Cookie
- 2 cups all-purpose flour (250 grams)
- 2 tablespoons natural cocoa powder
- 2 teaspoons cornstarch, AKA cornflour for those in Australia and UK
- 1/2 teaspoon baking soda
- 1/4 teaspoon salt
- 3/4 cup unsalted butter (168 grams) , softened to room temperature
- 3/4 cup granulated sugar (150 grams)
- 1/2 cup brown sugar (105 grams) , light or dark
- 1 large egg, room temperature
- 1 large egg yolk, discard the egg white
- 2 teaspoons vanilla extract
- 2 teaspoons red food coloring, gel or liquid, I used gel
- 1 cup white chocolate chips (180 grams) , or your favorite variety
Cream Cheese Frosting
- 1/3 cup unsalted butter (75 grams) , softened to room temperature
- 2 oz brick-style cream cheese (57 grams) , softened to room temperature
- 1-2 cups powdered sugar (110-220 grams), sifted
- 1/4 teaspoon salt
- 1-2 teaspoons whipping cream (15-30 ml), if needed
Instructions
Make the Red Velvet Cookie
- Preheat the oven to 350F (180C) degrees. Line the bottom of a 9-inch springform pan with parchment paper and grease the edges. Or lightly grease a 9-inch pie plate. I like to use a springform pan for this recipe.
- In a medium bowl sift together the flour, cocoa, cornstarch, baking soda and salt. Whisk together.
- In a separate large bowl beat together the butter, granulated sugar and brown sugar until creamed.
- Beat the egg, additional egg yolk, vanilla extract and red food coloring into the butter mixture.
- Add the flour mixture to the butter mixture. Start with the mixer on a low speed and beat together until combined.
- Stir the chocolate chips into the batter.
- Spoon the batter into the prepared pan. Spread into an even layer. Or alternatively, use a piece of wax paper to press the batter down into an even layer (be sure to remove the wax paper before baking.
- Bake in the preheated oven for about 30-35 minutes, or until the top looks set and an inserted toothpick comes out clean or with a few cookie crumbs.
- Remove from the oven and cool the cookie cake fully (keep in the pan as the cookie cake cools).
Cream Cheese Frosting
- With an electric mixer, beat the butter until smooth. Then beat in the cream cheese.
- Add in 1 cup powdered sugar (you may need to sift it in if it's lumpy) and salt. Beat in, starting with the mixer on a low speed.
- Beat in the rest of the powdered sugar about 1/2 cup at a time until the desired sweetness is reached. If needed, beat in 1 tablespoon of whipping cream.
- Once fully cooled, if you made the cookie cake in a springform pan unclamp the outer ring and carefully lift the cookie cake onto the plate you plan to serve it on. If you made the cookie cake in a pie plate, leave the cookie cake in the pie plate.
- Once the cake is fully cooled, pipe the frosting around the edges. I used a 1M tip for this. Optionally, decorate with sprinkles.
Notes
- Room Temperature Ingredients: The butter should be softened to room temperature and the eggs should be at room temperature for easier mixing.
- Food Coloring: Gel food coloring will produce a more intense color. Depending on your preference, feel free to use 1-2 teaspoons of food coloring.
- Bake Times: Some readers noted that their ovens took longer to bake. This can depend on if using a metal pan, or glass or ceramic pie plate. If needed bake up to 40 minutes. If using an 8-inch pan instead of 9-inches, the bake time will be 40-45 minutes. If the top starts to brown too much, tent a piece of aluminium foil overtop for the last 10 minutes of baking.
- Nutrition: Details provided are an estimate only and based on 1 slice with frosting, assuming that all of the frosting is used and that the cookie cake is sliced into 10 equal pieces. You could likely get 12 slices of this recipe.
- Storage: Store cookie cake covered or in an airtight container at room temperature for up to 4 days (if not frosted). If frosted, store covered at room temperature for up to 8 hours or in the fridge for up to 4 days.


I made this for my girlfriend for Valentine’s Day and it was fantastic! Thank you so much for sharing it. But now I’m wondering, is the batter in this recipe suitable for making regular cookies?
Thanks so much Jude! I find this batter doesn’t really hold up to regular cookies. Instead – I’d try this recipe for red velvet cookies
Thanks for the suggestion ! I’ll have to try making those sometime 👍
Hi! Would I divide recipe in half for a 6 in springform pan?
I think that would be fine – I’m not entirely sure how it would affect the bake time, so you’d just have to be a bit careful to watch for when it’s done baking
Wonderful recipe. It was beautiful and tasty! I followed the recipe as is but used a 10 inch pan and it turned out perfectly. Thank you!
Made this today. Delish! Do you have a recommendation for a cream cheese frosting that pipes well? I tried to pipe rosettes around the border, but this frosting kind of lost its shape and the rosettes sort of turned into blobs. Thanks!
I’m so glad that you loved the recipe. I find sometimes if the cream cheese is too warm it’s hard to pipe, so I’ll pop the frosting in the fridge for 30 minutes or so before trying to pipe it. Also, replacing 50% of the butter with shortening because it’s a little sturdier at room temperature.
Hi Fiona, this is to die for! Loved it so much that I featured a modified version of it on my own blog (giving you credit, of course!): https://alovelettertofood.com/recipe/red-velvet-cookie-cake/ Thanks for a great recipe!
Hey Fiona, I was wondering did you use liquid cornstarch or powder?
I used powder cornstarch. Sorry for the slow reply – I’ve been out of town for the weekend
May I substitute green food coloring for St. Patrick’s Day ? Would that work? Thanks!
Flavor wise, I think that would be totally fine. I haven’t tried it though, so I’m not sure how much green food coloring you’d need to get a pretty green color.
This was such an easy recipe to follow and turned out delicious! I did have an issue with the baking time, I checked it after 25 minutes, then 30 minutes then 40 minutes. The center kept coming out soupy (for lack of a better word) therefore the edges were a little more crunchy than preferred but still tasted great!
I’m glad you enjoyed it and thanks for the tip! I’m going to make a note in the recipe about bake times 🙂
As a big-cookie lover and cream cheese frosting fanatic, this is going on my list of must-make desserts. It looks SO delicious.
Totally with you on being a cream cheese frosting fanatic! Let me know what you think of the recipe!
Must make this!