Candy Cane Icebox Cake
I may receive compensation in the form of payment or products to supplement my posts, but all opinions remain my own. Read our disclosure policy.

For an easy, holiday dessert – make this candy cane icebox cake! It has layers of creamy peppermint filling alternating with Oreo cookies. Then it’s topped with whipped cream, crushed candy canes and chocolate drizzle. The perfect no-bake Christmas dessert.

An icebox cake is a dessert that alternates between layers of a creamy no-bake filling and cookies or biscuits. Some recipes simply use whipped cream between the cookies, whereas others use a flavored whipped cream or a no-bake cheesecake type filling.
This candy cane icebox cake is the perfect version for the holidays. The cream layers are a no bake cheesecake-esque filling that’s flavored with peppermint and extra creamy. It’s not as tangy as a traditional cheesecake and surprisingly light and airy. For the cookies, we’re using classic Oreos – because chocolate is always a must. Then it’s topped with more whipped cream and crushed candy canes.
The Oreos soften slightly as the cake sets in the fridge. This candy cake icebox cake tastes like a cloud of creamy peppermint. Best of all – this dessert is so easy to make. It’s perfect for Christmas because you don’t need to add any stress onto your holidays.
I like to think of this peppermint icebox cake as an easier, creamier, fluffier, no-bake version of my peppermint cheesecake recipe.

Making the Creamy Peppermint Filling
- Whip the cream until stiff peaks form.
- In a separate bowl, beat together the cream cheese, powdered sugar, peppermint extract and optional food coloring.
- The mixture should be a brighter red color than you want the finished product to be – it will only lighten when you add in the whipped cream.
- Ensure that you turn off the mixer and scrape down the sides of the bowl a few times so that you don’t have any lumps on the bottom of your bowl.
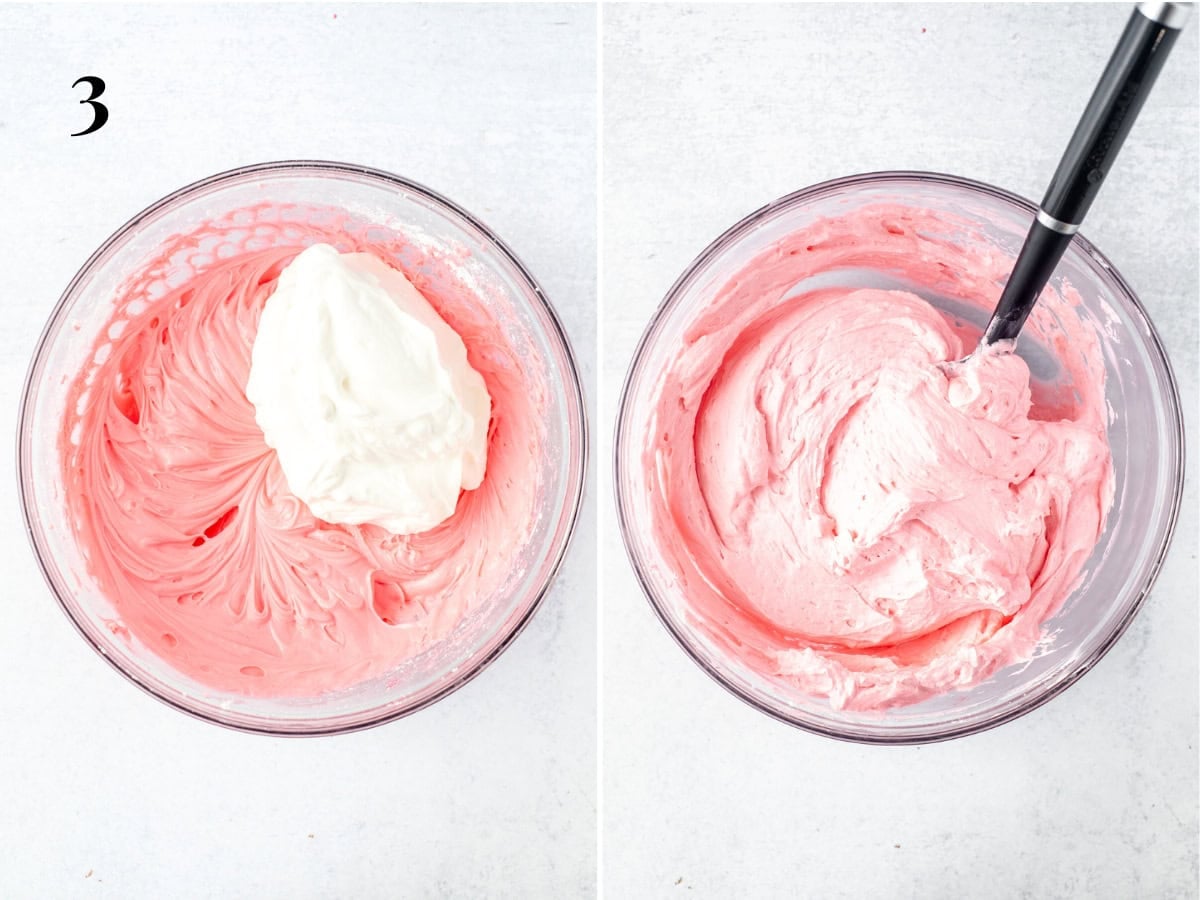
- Using a rubber spatula, gently fold the whipped cream into the cream cheese mixture. I do this about 1/2 at a time. When you’re done, you should no longer see streaks of whipped cream.
Assembling & Serving
To assemble the cake:
- Pour about 1/4 cup milk into a shallow bowl. You’ll then gently dip each cookie into the milk. Shake off any excess milk. You don’t want the cookies to be soggy already. This stope is just so that the cookies are slightly softer so that the cake is easier to slice.
- You’ll spread a few tablespoons of filling onto the bottom of the pan.
- Then place a layer of Oreo cookies. I do 4 rows of 4 cookies. If using a 9×9 inch pan – you can likely fit 5 rows of 5 cookies
- Spread 1/2 of the remaining filling on top.
- Place a layer of Oreos, again 4 rows of 4.
- Spread the remaining filling on top.
- Cover the pan and place in the fridge to set. At least 4 hours or overnight.

When ready to serve, you can whip more whipping cream and spread on top. Then I like to add a layer of crushed candy canes.
Recipe Tip
This can be served frozen if you prefer. If you plan to freeze, cover the pan and freeze. Add the whipped cream topping right before serving.

Creamy, dreamy, no-bake and perfect for Christmas – this candy cane icebox cake is like a fluffy cloud of peppermint! If you need an easy dessert this Christmas, this is the recipe!
For more candy cane desserts, be sure to try:
- Candy Cane White Chocolate Chip Cookies
- Chocolate Peppermint Bundt Cake
- Candy Cane Brownies
- Chocolate Peppermint Cheesecake

Candy Cane Icebox Cake
Equipment
- 8×8 inch (20×20 cm) pan
Ingredients
Peppermint Filling
- 1 1/2 cups whipping cream (360 ml)
- 10 ounces full-fat cream cheese (283 grams), brick style, softened to room temperature
- 1 cup powdered sugar (110 grams), sifted
- 1-2 teaspoons peppermint extract, depending on how minty you like it, start with 1 teaspoon
- red food coloring, I used gel, optional
Oreo Layer
- 32 Oreo Cookies, you'll likely need 50 cookies if using a 9×9 inch pan
- 1/4 cup milk, for dipping the cookies in
Topping
- 2/3 cup whipping cream (160 ml), cold, from the fridge
- 2-4 candy canes
Instructions
- Optionally, line an 8×8 (20×20 cm) or 9×9 inch (23×23 cm) pan with parchment paper, so that there's an overhang around the edges. If you choose not to line the pan, you will slice and serve the cake from the pan.
Peppermint Filling
- Place the whisk attachment and bowl of your stand mixer (or a large bowl) in the freezer for 10 minutes. Then beat the whipping cream (using the cold bowl and cold whisk attachment) until stiff peaks form. Set aside.
- In a separate large bowl, beat together the cream cheese, powdered sugar, peppermint extract and a few drops of red food coloring until smooth and creamy. Turn off the mixer a few times and scrape down the bottom and sides of the bowl to ensure there are no lumps. If using food coloring, the color should be slightly darker than you want the final product to be, because it will lighten after you add the whipped cream
- Using a rubber spatula, fold the whipped cream from step 1 into the cream cheese mixture. I typically do this about 1/2 at a time. Go gently. When finished, it should be an even consistency. You shouldn't see streaks of dollops of white whipped cream.
Assemble
- Pour the milk into a shallow bowl. Lightly dunk each cookie in the milk and shake off the excess. If you plan to keep the cake in the fridge overnight before serving, you could skip this step.
- Spread about 2-4 tablespoons of peppermint filling onto the bottom of the pan.
- Add a layer of Oreo cookies on top – for an 8×8 inch (20×20 cm) pan, you'll do 4 rows of 4 cookies. For a 9×9 inch (23×23 cm) pan, you likely can fit 5 rows of 5 cookies.
- Spread about 1/2 of the remaining filling on top of the Oreo layer.
- Add a second layer of Oreo cookies – again doing 4 rows of 4 cookies, or 5 rows of 5 cookies.
- Spread the remaining peppermint filling on top.
- Cover the pan and place in the fridge to set for at least 4 hours.
Serving
- When ready to serve, beat the additional 2/3 cup whipping cream until stiff peaks form. Spread into an even layer on top of the cake. This step can be done in advance if you like.
- Sprinkle the top with crushed candy canes. Note – only do this step right before serving. If the cake is stored with crushed candy canes in the fridge, the candy canes can melt or bleed color due to condensation.
- When ready to slice, if you lined the pan with parchment paper, carefully lift out of the pan using the overhang of the parchment and place on a cutting board.
- Slice the cake using a thin knife, be sure to wipe off the knife with a clean, damp cloth or clean paper towel in between each slice for clean cuts. Lift using a square spatula – I prefer metal.
Notes
- Doubling the Recipe: This recipe can be doubled and made in a 9×13 inch pan. It will be thicker however, and therefore you might not need quite all of the filling. If using a 9×13 inch pan, I do not recommend lining with parchment because the cake is too large to easily lift out of the pan.
- Peppermint Extract: Peppermint extract can be found in the baking aisle of your grocery store, typically near the vanilla extract.
- Nutrition: Details provided are an estimate only based on 1 slice, assuming the pan is sliced into 12 uniform pieces.
- Storage: Store covered or in an airtight container in the fridge for up to 4 days. I recommend only adding the crushed candy canes right before serving, as they can bleed color onto the whipped cream.


