Chocolate Chip Cookie Icebox Cake
I may receive compensation in the form of payment or products to supplement my posts, but all opinions remain my own. Read our disclosure policy.

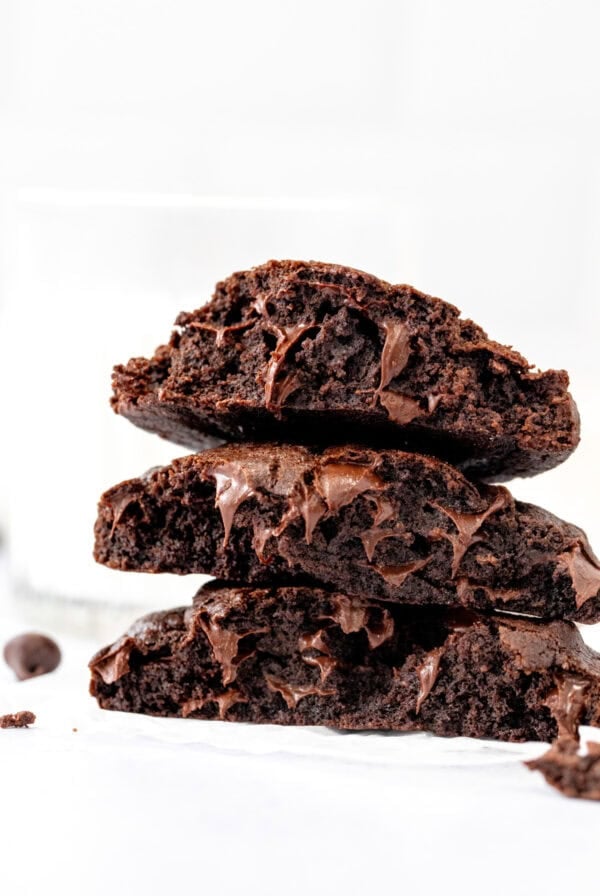
This chocolate chip cookie icebox cake has layers of cookies alternating with sweetened whipped cream. Easy, no bake and totally creamy – this is the perfect dessert for anyone who loves chocolate chip cookies with a cold glass of milk.

This simple icebox cake is designed for cookie lovers. It’s the sister recipe to my Oreo icebox cake, and incredibly simple to make.
You can use homemade chocolate chip cookies, or store bought to save time. I like using my everyday chocolate chip cookie recipe or my pudding mix chocolate chip cookies – but feel free to choose your favorite. The cookies are gently dipped in milk so that they soften, making the cake easier to slice. If your cookies are already really soft, you could skip this.
The cream filling is similar to a no-bake cheesecake, only its a little less tangy and a little lighter in texture because there’s more whipped cream compared to cream cheese. I like the addition of a little cream cheese because it thickens the filling (compared to using just whipped cream), cuts the sweetness, and makes the cake much easier to slice.
Note: A lot of icebox cake recipes use cheesecake flavored pudding mix. While there is nothing wrong with this, I prefer the flavor of using whipping cream, powdered sugar, vanilla and cream cheese for the filling. I find the flavor creamier and it doesn’t taste artificial. Plus, making the homemade filling really doesn’t require much more effort.

How to Make a Cookie Icebox Cake
As mentioned, this recipe is very simple. You can use homemade chocolate chip cookies, or store bought.
Make The Filling
- Beat the whipping cream until stiff peaks form. Set aside.
- Whenever making whipped cream, place the bowl and whisk attachment of your beater in the freezer for 10 minutes first. This makes the process so much easier.
- Beat together the cream cheese, powdered sugar and vanilla extract. It should be smooth and creamy.
- Fold the whipped cream into the cream cheese mixture. If you’re having a hard time incorporating all the whipped cream by hand, you can use an electric mixer. Be careful not to over mix or it can deflate.

Assemble
Note that if your cookies are very hard/crunchy – especially if they’re store bought – I recommend dipping them in milk first. This softens the cookies so that the cake is easier to slice. You do not need to get them soggy – just the quickest dip and shake off the excess milk.
- Spread a Thin Layer of Filling on the bottom of the pan – about 2-3 tablespoons is enough. This is so the cookies can stick.
- Place a Layer of Cookies. You can break a few cookies apart to fill in any big gaps.
- Add 1/2 of the Remaining Filling. Spread into an even layer.
- Add a Second Layer of Cookies. Again, dipping them in milk if needed first.
- Spread the Rest of the Filling. Smooth into a creamy even layer.
- Add a Third Layer of Cookies. Because more cookies is always a good thing.

Chill. Cover the pan and place in the fridge for at least 4 hours before serving. This helps the filling set so that the cake is easy to slice.
Serve. You’ll add a layer of whipped cream on top right before serving (or you can do it earlier too). Optionally, sprinkle the top with more cookie crumbs or top each piece with an extra cookie.
Recipe Tip
If you’d like to use whipped topping – such as Cool Whip – instead of whipped cream, skip Step 1 when making the filling. In Step 3, fold in 2 cups of thawed whipped topping. Use an additional 1 cup of thawed whipped topping on top when serving.

Freezing
I find that this cookie icebox cake is best chilled in the fridge, instead of serving from frozen. When frozen, the cookies can become hard to slice. If you’d really like to serve it frozen, wrap the pan tightly and freeze. Add the top whipped cream layer right before serving.
A Note from Fiona
Why you’ll love this icebox cake!

This recipe is so simple to make and perfect for anyone who loves chocolate chip cookies. Feel free to use your favorite chocolate chip cookie recipe – I recommend this one – or even store bought if you’re short on time. I love how creamy the filling is!
More Icebox Cake Recipes:

Chocolate Chip Cookie Icebox Cake
Equipment
- 9×13 inch (23 x 33 cm) baking pan*
Ingredients
- 2 cups whipping cream (480 ml), 33-35% MF, cold
- 16 ounces full-fat cream cheese (452 grams)
- 1 cup powdered sugar (110 grams)
- 2 teaspoons vanilla extract
- 3/4 cup whipping cream, for the topping
- 36-48 chocolate chip cookies, this will depend on the size of your cookies
- 1/2 cup milk (120 ml), if needed, if your cookies are crunchy
Instructions
Make the Filling
- In a large bowl, beat the 2 cups whipping cream until stiff peaks form. Set aside. For easier whipping, place the bowl in the freezer or fridge for 5 minutes before getting started. The cream should be cold before whipping.
- In a separate large bowl, beat together the cream cheese, powdered sugar and vanilla extract until smooth and creamy.
- Fold the whipped cream into the cream cheese mixture.
Assemble
- If your cookies are hard and crunchy, pour about 1/2 cup milk into a shallow dish or bowl. Dip each cookie quickly into the milk and brush off the excess.
- Spread a few tablespoons of filling onto the bottom of a 9×13 inch pan.
- Place a layer of cookies on the bottom of the pan. You can break up a few cookies to fill any gaps.
- Spread 1/2 of the remaining filling on top of the cookies.
- Place a layer of cookies on top.
- Spread the remaining filling on top of the cookie layer.
- Place a third layer of cookies on top.
- Cover the pan and place in the fridge for at least 4 hours before serving.
- Beat the remaining 3/4 cup whipping cream until stiff peaks form and spread into an even layer. Place back in the fridge until ready to serve (you can add the whipped cream topping at any point before serving).
- When ready to serve, slice with a thin, sharp knife. Use a square lifter to remove each slice. Optionally, top with more cookies.
Notes
- Chocolate Chip Cookies: You will need about 36-48 cookies, depending on how large your cookies are. I use a full batch of my everyday chocolate chip cookie recipe, and have some leftover for decorating and snacking. For context – that recipe uses an entire cup of butter. If using Chips Ahoy cookies – you’ll need 2 packages.
- Whipping Cream: I use whipping cream in the carton, 33-35% MF, to make whipped cream in Step 1 of making the filling, and Step 9 of assembling. If you’d like to use whipped topping instead, skip Step 1 of the filling and fold in 3 cups thawed Cool Whip. In Step 9, use about 1 to 1 1/2 cups Cool Whip.
- Storage: Store in the fridge.
- Nutrition: Details provided are an estimate only and based on 1 slice, assuming the pan is sliced into 18 uniform pieces.