Fluffernutter Bars
I may receive compensation in the form of payment or products to supplement my posts, but all opinions remain my own. Read our disclosure policy.
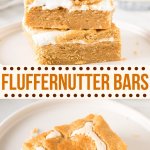
Soft and chewy peanut butter bars with a layer of gooey marshmallow in the middle. If you love the classic sandwich or the combo of sweet and salty – then these fluffernutter bars are for you.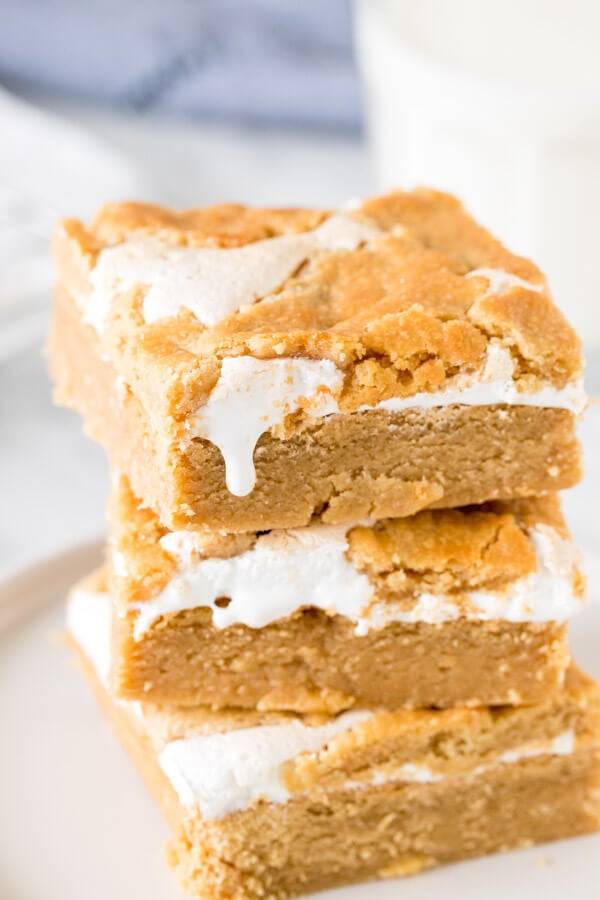
I can’t say I’ve ever tried a fluffernutter sandwich – there’s something about eating peanut butter and marshmallow fluff between 2 slices of white bread that seems a little odd and would lead to a very sticky situation. But despite my hesitation about the sandwich, I love using the flavor combo in baking. You can easily tailor how sweet you’d like your dessert to be, and the salty-sweet combo is seriously addictive.
I truly believe these fluffernutter bars are the perfect way to showcase the flavors. The base is a soft and chewy peanut butter blondie. It’s not too sweet, and deliciously peanut buttery. Then there’s a layer of marshmallow fluffy in the middle for just the right amount of gooeyness. You’ll reserve a little bit of the peanut butter blondie mixture, then cobble it on top of the marshmallow layer.
Essentially, you’re surrounding the sweet marshmallow spread with a chewy peanut butter bar.
To get started we make the peanut butter layer. It doubles as the baste and the topping layer. It was important to me that the peanut butter layer wasn’t too sweet – since marshmallow fluff is plenty sweet on its own. The bars are soft and chewy, without being too dense, because we’re using just the right amount of flour. Be very careful to measure the flour correctly – otherwise, the bars can get dry. Spoon it into a measuring cup, then level off the top.
You’ll reserve about 1 cup of the peanut butter dough. The rest gets pressed into the bottom of a 9×13 inch pan to form an even layer. Bake the peanut butter base on its own for about 20 minutes, or until the top is set.
Then you’ll spread a whole jar of marshmallow fluff on top of the peanut butter layer. I truly believe that this is the most challenging part of the recipe because marshmallow fluff is so extremely sticky. If you want a really thick layer of marshmallow, you could use 1 1/2 jars – but I find 1 jar is the perfect amount for bars that aren’t too sweet and gooey without being too messy. 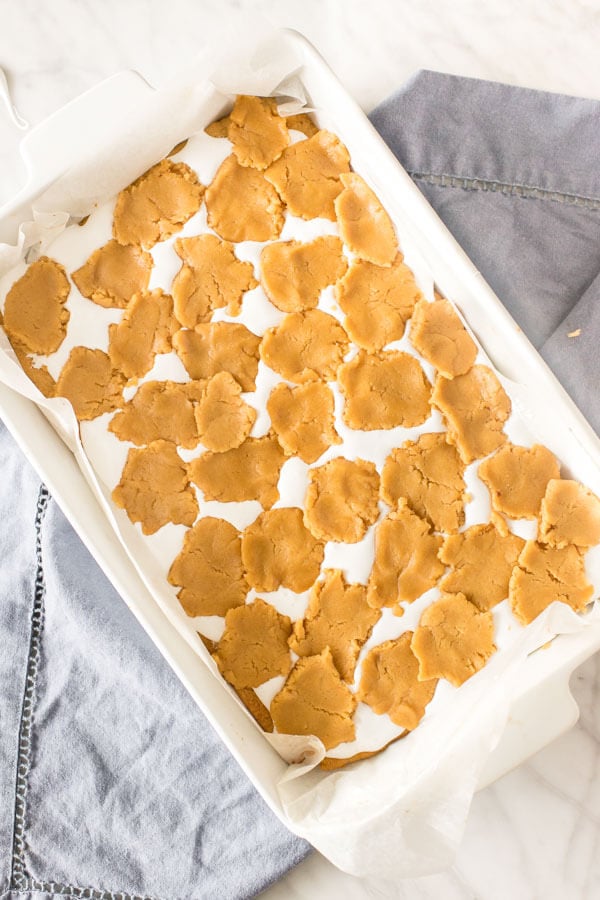
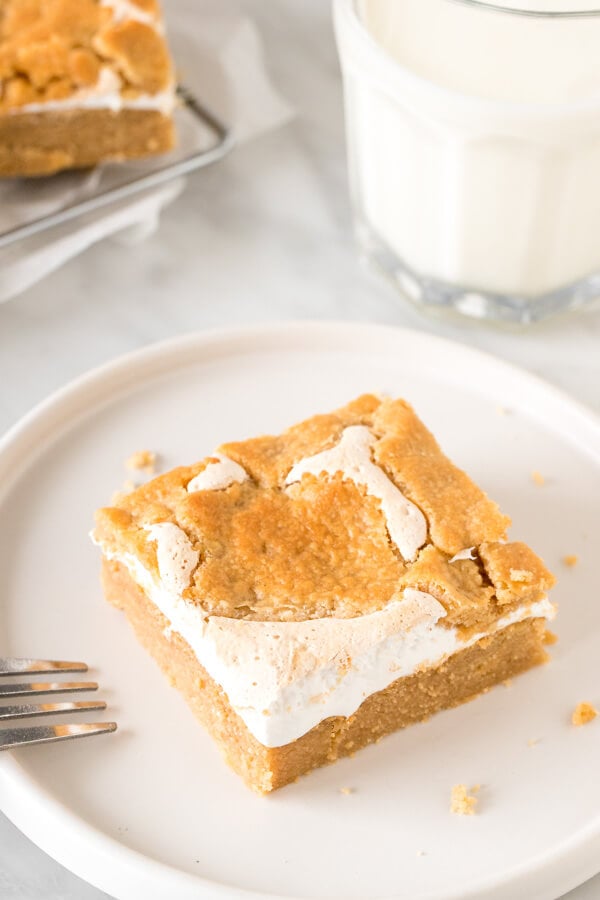
Then you’ll pinch of pieces of the reserved peanut butter dough, flatten them slightly and scatter them over the top of the marshmallow layer. You don’t need to cover all of the marshmallow layer – I covered about 80-90%. Then pop the pan bag in the oven to bake the top peanut butter layer. It will only need to bake for about 10 more minutes, or until the peanut butter pieces no longer look doughy. I recommend turning off the top element of your oven (if possible) to avoid the marshmallow that peaks through potentially burning.
Pro Tip: Let the bars cool for at least an hour before slicing them. To slice, lift the bars out of the pan using the overhang of the parchment paper lining and place the bars on a cutting board. Slightly spray a sharp knife with non-stick cooking spray before cutting into the bars. This helps minimize the marshmallow fluff sticking on your knife. 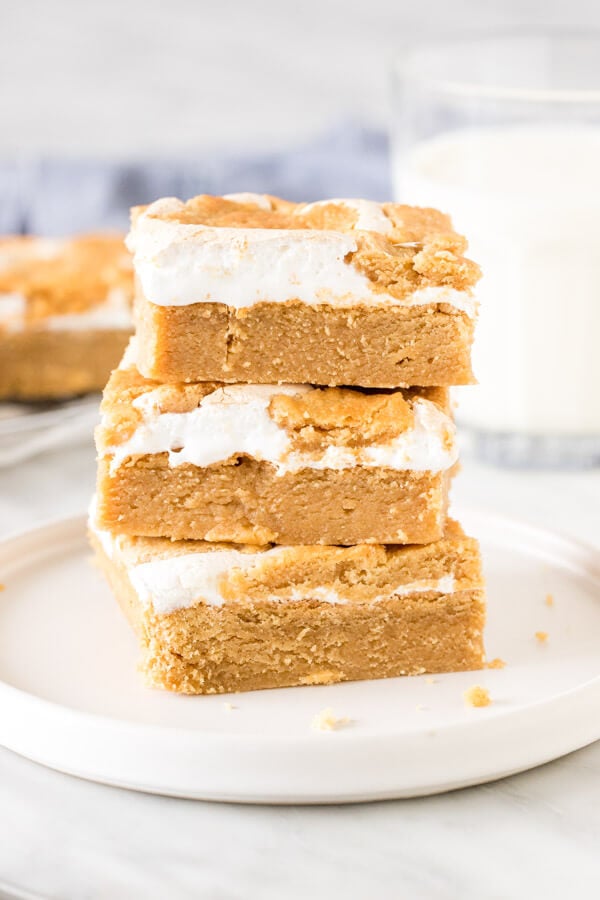
The bars are chewy, soft, and have the perfect amount of goo. With the perfect amount of salty and sweet – these fluffernutter bars are incredible.
And if you love marshmallows – don’t forget these fluffernutter sandwich cookies or these marshmallow oreo brownies.

Fluffernutter Bars
Equipment
- 9x13 Inch Pan
Ingredients
- 2 1/4 cups all-purpose flour
- 1 teaspoon baking powder
- 1/4 teaspoon salt
- 3/4 cup unsalted butter, softened
- 3/4 cup brown sugar
- 1/3 cup white sugar
- 1 1/2 cups smooth peanut butter*
- 1 large egg
- 1 large egg yolk, in addition to the other egg, discard the white
- 7 oz jar marshmallow fluff
Instructions
- Preheat the oven to 350F degrees and place the oven rack in the middle of the oven.
- Line a 9x13 inch pan* with parchment paper, leaving an overhang around the edges. Or line with aluminum foil and lightly grease.
- In a medium bowl whisk together the flour, baking powder and salt.
- In a separate large bowl beat together the butter, brown sugar and white sugar until soft.
- Beat in the peanut butter. Then mix in the egg and egg yolk until smooth.
- With the mixer on low speed, mix the flour mixture into the peanut butter mixture about 1/2 at a time.
- Remove about 1 cup of batter from the bowl.
- Press the rest of the peanut butter dough into the bottom of the lined pan, to form an even layer.
- Bake the peanut butter layer in the preheated oven for 25 minutes, or until the top looks fully set.
- Remove the pan from the oven (keep the oven turned on). Carefully spread the entire jar of marshmallow fluff on top of the peanut butter layer.
- Pinch of pieces of the reserved peanut butter cookie dough, flatten them slightly into pieces about 1 inch in size and place on top of the marshmallow layer. You do not need to entirely cover the marshmallow layer - mine was about 80-90% covered.
- Place the pan back in the oven and bake for 10 minutes, or until the peanut butter layer on top is set.
- Remove the pan from the oven and let the bars cool at room temperature for at least 1 hour before slicing.
- Before slicing, lift the bars out of the pan using the overhang of the parchment paper/aluminum foil and place on a cutting board.
- Slightly grease a thin, sharp knife with non-stick cooking spray (this is optional - but helps to avoid the marshmallow layer sticking onto the knife) and slice the bars.
Notes
- I do not recommend using natural or homemade peanut butter (or any peanut butter without stabilizers) because it can separate and lead to too much oil or not enough oil. If using crunchy peanut butter - use 1 3/4 cups instead.
- Using a metal pan will make the edges crispier, whereas a glass pan will make the edges a little less crispy.
- Store bars in an airtight container at room temperature for up to 5 days.
- Nutrition information is based on 1 bar, assuming the recipe is sliced into 15 even-sized pieces. It is meant as an estimate only.
Nutrition
I went against all suggestions and use natural peanutbutter that you have to stir and I added everything the to the pan before baking (fluff and top layer). They turned out perfect. Not crumbly or underbaked. I make a smores bar that’s like this so I was pretty confident with the layers.
These are so yummy but my first peanut butter layer is a bit crumbly. Is there something I might have messed up?
Mine was also really crumbly and dense. It was also not a pleasant texture.