Peanut Butter Rice Krispie Treats
I may receive compensation in the form of payment or products to supplement my posts, but all opinions remain my own. Read our disclosure policy.

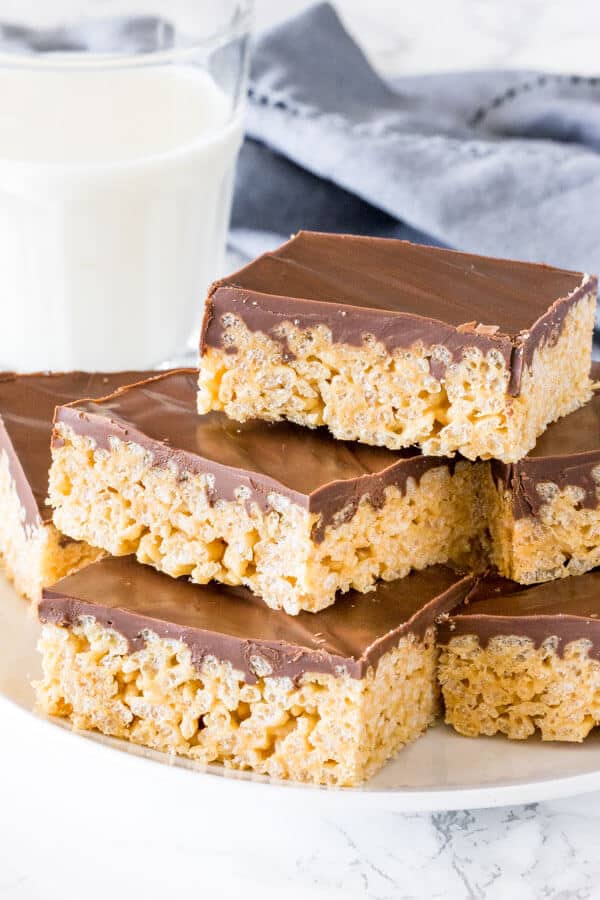
Peanut Butter Rice Krispie Treats are gooey, chewy and perfect twist on the classic Rice Krispies. Made with marshmallows, peanut butter, and a thick layer of chocolate on top!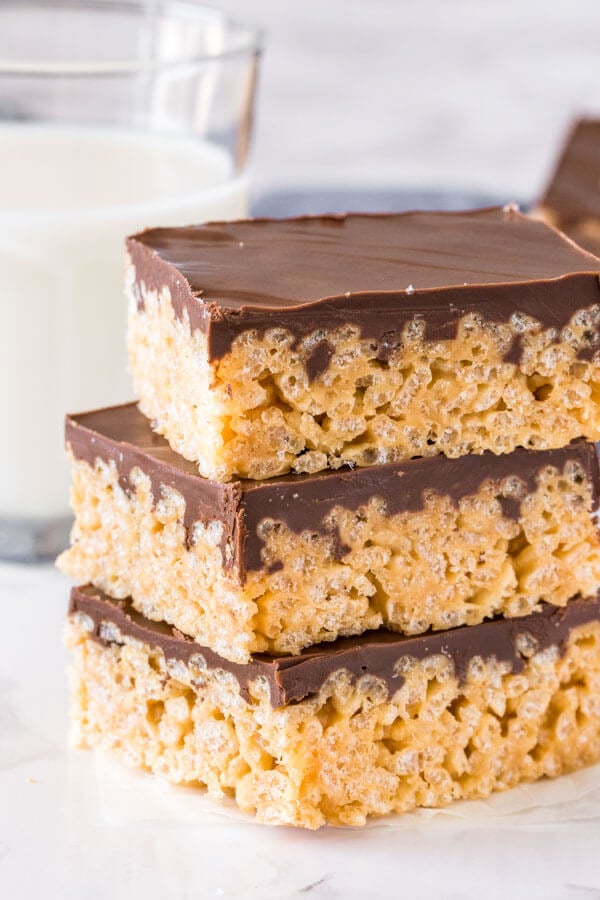
If you love easy recipes & peanut butter – then these peanut butter Rice Krispie treats are just the thing for you. It’s an easy, no-bake recipe that you can whip up in no time. And when there’s peanut butter & chocolate involved, you really can’t go wrong.
As a child, I absolutely loved Rice Krispie treats. Sometimes if I was lucky my Mom would make them for us after school and they’d still be warm, not quite set and all gooey by the time we got home. When I was in university, I made them in the microwave. I’d have a ball of sticky, crunchy, marshmallow deliciousness ready in 2 minutes. And it was the perfect comfort food for late-night study sessions.
Peanut Butter Rice Krispie Treats
These peanut butter Rice Krispies are chewy, peanut buttery, and ridiculously delicious with a layer of chocolate on top.
For ingredients, you’ll need:
- 1/4 cup unsalted butter
- 1 10-oz bag mini marshmallows or 5 cups
- 1/2 cup peanut butter
- 6 cups Rice Krispie cereal (or whatever generic brand works too)
I prefer using mini marshmallows because they melt more easily – but if you only have large ones, 1 cup of mini marshmallows is equal to 8 large ones (so you’d need 40 total for the recipe). To use marshmallow cream, one 7 oz jar is equal to 1 1/2 cups mini marshmallows.
Pro Tip: For extra gooey Rice Krispie Treats – only use 5 1/2 cups Rice Krispies in this recipe.
I typically make these on the stovetop. But you can also use your microwave to melt together the butter, peanut butter and marshmallows.
To make peanut butter Rice Krispie treats in the microwave, here’s how:
- Add the butter and marshmallows to a large heat-proof bowl.
- Microwave for 1-minute intervals on medium power, stirring between each until they are both melted.
- Stir in the peanut butter.
- Then stir in the Rice Krispies.
- Press into the pan & allow to harden.
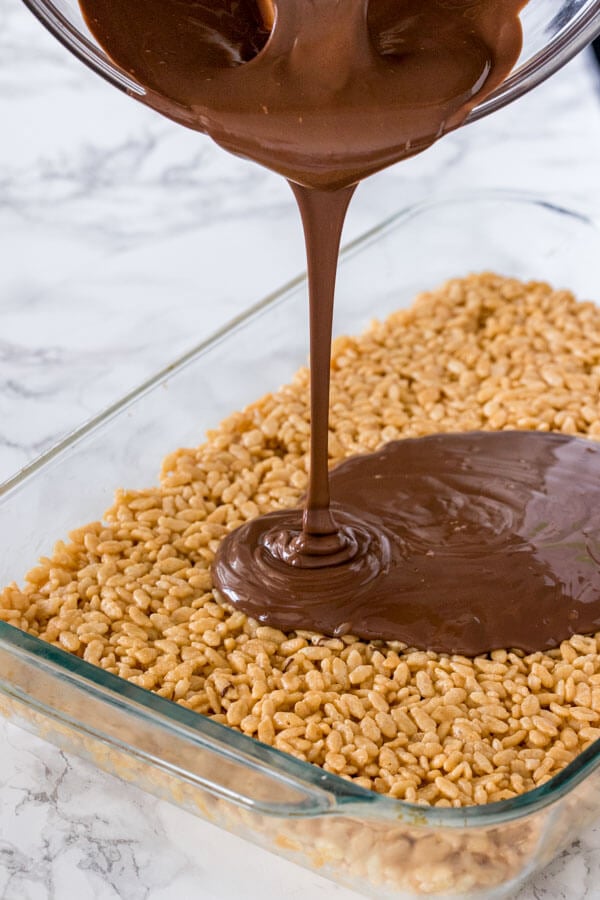
Then a layer of delicious chocolate goes on top. It’s optional – but I don’t think you’ll get any complaints if you add the chocolate 🙂 N
Tips, Tricks & Common Questions
Can I use natural peanut butter? I don’t recommend it because the peanut butter can end up separating and then the bars won’t warden.
Can I use chunky peanut butter? Definitely – but I recommend using 3/4 cups instead. I personally prefer the texture without the peanuts, but it’s up to you.
Can I freeze them? Absolutely. Place them in an airtight container with wax paper in between each layer of squares. Freeze for up to 2 months, then thaw in the fridge before bringing to room temperature and serving.
Mine got too hard – what happened? If your rice krispie treats get too hard – that often means that the marshmallows started to burn. Next time, turn the burner to a lower heat setting and very slowly melt everything together. You can also try adding in a little less cereal – try 5 3/4 cups. If I end up with a batch that is too crunchy – I often warm them up for about 15 seconds in the microwave before enjoying.
My rice krispies didn’t stick together – what happened? Next time, try packing them down more firmly into the pan. Or if your kitchen is quite hot, you can let them firm up in the fridge.
Do not store Rice Krispie Treats in the fridge – they will get too hard!
If you love peanut butter no-bake treats, try these other favorites:

Peanut Butter Rice Krispie Treats
Ingredients
- 1/4 cup unsalted butter
- 1 10 oz bag mini marshmallows, about 5 cups
- 1/2 cup peanut butter
- 6 cups Rice Krispie cereal*
- 8 oz chocolate chips, about 1 1/3 cups
- 2 teaspoons vegetable oil
Instructions
- Lightly grease a 9x13 inch pan with butter or non-stick cooking spray.
- In a large saucepan melt the butter, mini marshmallows and peanut butter together over low heat while stirring gently.
- Once melted, remove from the heat and stir in the Rice Krispies.
- Press the mixture into the pan (lightly spray your hands with non-stick cooking spray to avoid the mixture sticking to your hands).
- Add the chocolate chips (or chopped chocolate) to a medium-sized heatproof bowl. Microwave for 45-second intervals on medium power (not high or standard), stirring in between each burst.
- Once almost melted, stir until smooth and stir in the vegetable oil.
- Pour the chocolate over the top of the bars and let harden at room temperature (about 2 hours).
- Cut into squares and store in an airtight container at room temperature.
Notes
Nutrition
Adapted from Kellogg’s


Love this recipe. Never made this kind before followed everything on it exactly. It turned out so well. My family loves it. I love the chocolate covering. Soo good. Thank you
I agree with Deb – update the recipe to 12-16 oz. Chocolate chips, and I melted mine with a couple teaspoons each butter and honey.
I also tossed the whole thing in a warm oven for a few minutes to smooth the chocolate. Other than that – great recipe!
8 ounces of chocolate chips doesn’t cover a 9×13 pan (not even a thin layer). I should have read the reviews prior. Perhaps update the recipe to 12 ounces of chocolate chips? I’m kind of embarrassed to serve this as a bday treat tomorrow.
My Mom used half chocolate chips and half peanut chips and mixed them to cover rice krispies treats. They are so very good!
Loved it. Stores can’t seem to keep these in stock and Grandkids love them. Thank you. I am a fan!!
These are awesome and my dad is in love!
This is the BEST recipe ever!! A friend who loves Reese’s Peanut Butter Cups inspired me to make these with cocoa krispies, put a thin layer in the pan, then put a layer of thin Reese’s Peanut Cups and another thin layer of the rice cereal mixture. Instead of melting the chocolate on top, I sprinkled mini chocolate chips on them. I’ve been asked to make these again this week for our City’s Disney Night! Thank you so much for this recipe!!
Thank you so much, Beth!
Nice and moist. I put dark melted chocolate on top. Breakfast of champions
Hey – there’s cereal! I support them for breakfast!
Can these be frozen?
Yes, but be sure to thaw in the fridge. Then let them sit on the counter so that they aren’t cold when you bite into them. I will say though that chocolate can discolor after it’s been frozen (it can get these kind of white dots) – it’s safe to eat, but won’t look as nice. So if you’re planning to freeze them, I’d add the chocolate topping after you thaw them.
Thank you, nice details on treaking, the recipe, it answered some of my issues, I never like to follow a recipe, exactly. I like thought process, I’ll be back.
Thank you so much, Karen. Happy baking!