Chocolate Mousse Pie
I may receive compensation in the form of payment or products to supplement my posts, but all opinions remain my own. Read our disclosure policy.

Decadent, creamy, and perfectly rich – this chocolate mousse pie is a showstopper. It’s completely no-bake, and easier to make than you may think! 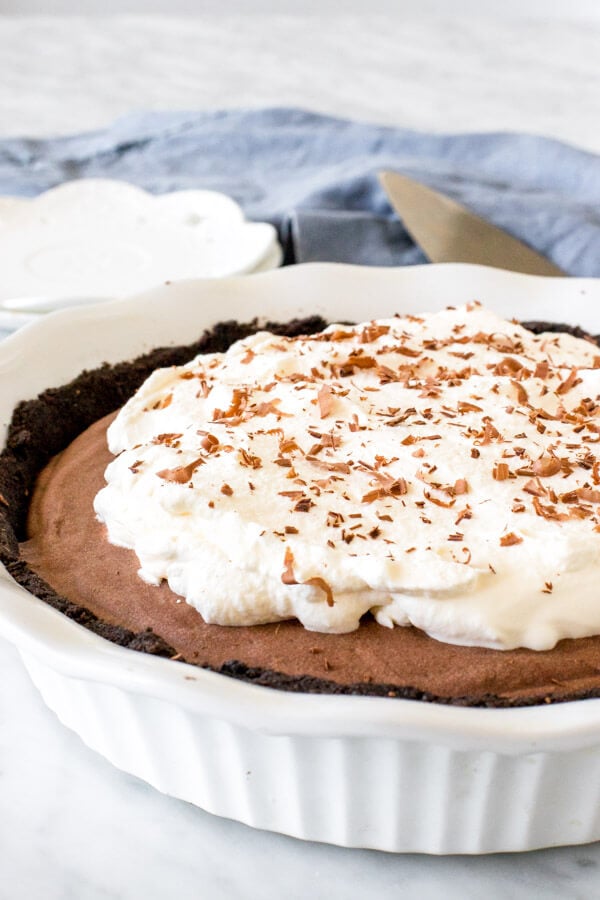
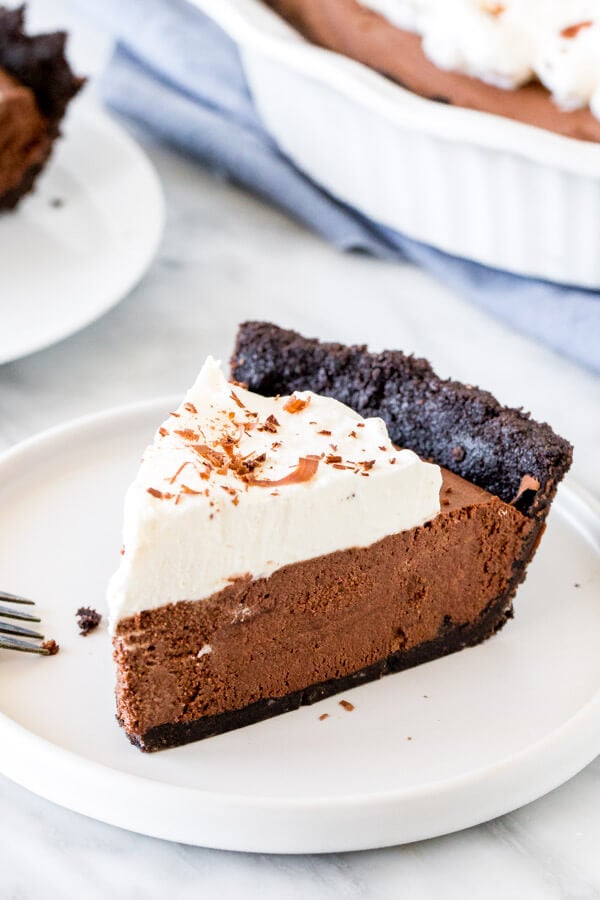
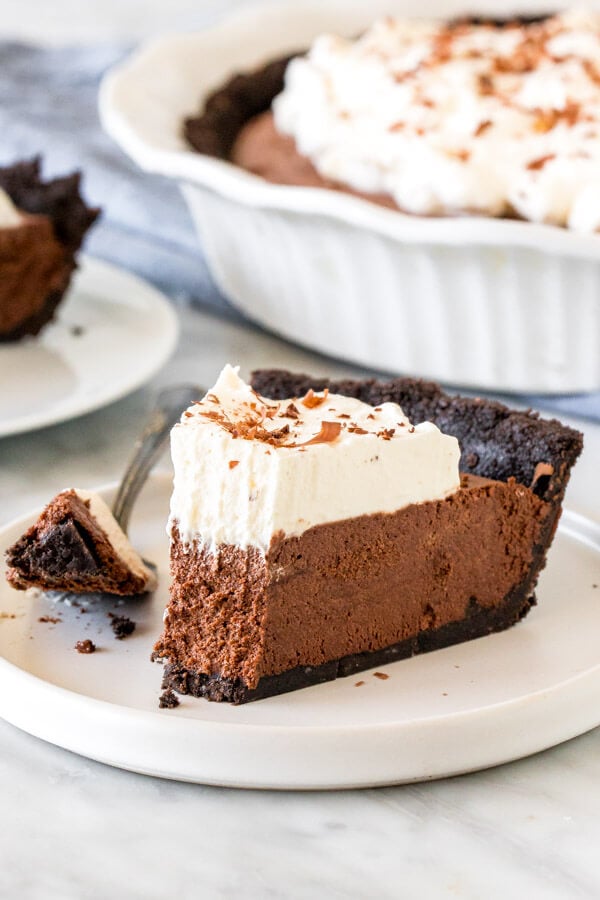
If you love chocolate desserts that verge on sinful, then this chocolate mousse pie is for you. The chocolate mousse has a creamy, dark chocolate flavor and perfectly mousse-y texture. It’s supported with an Oreo cookie crust and piled high with whipped cream to create a pie that not only looks impressive – but also packs a serious chocolate punch.
The chocolate mousse filling uses an easy, shortcut method. Traditional chocolate mousse is made with raw eggs and can be pretty tricky to make. This recipe is made without the eggs though, so your pie is also a lot safer for more people to eat and the recipe is a lot more foolproof than the endless whisking that’s required when making mousse the traditional way. The mousse filling is a little firmer than traditional chocolate mousse – which is perfect for slicing pieces of pie.
How to Make Chocolate Mousse Pie
For the Oreo Crust
The chocolate crust is made with crushed Oreo cookies and melted butter. You want to use the entire cookies (wafers and filling) because the filling provides more flavor and acts like glue to hold the crust together. After mixing the ingredients together, you’ll press the mixture into the bottom and up the sides of a 9-inch pie plate.

Note that if you want to save a bit of time – you could use a premade Oreo crust or graham cracker crust.
For the Chocolate Mousse
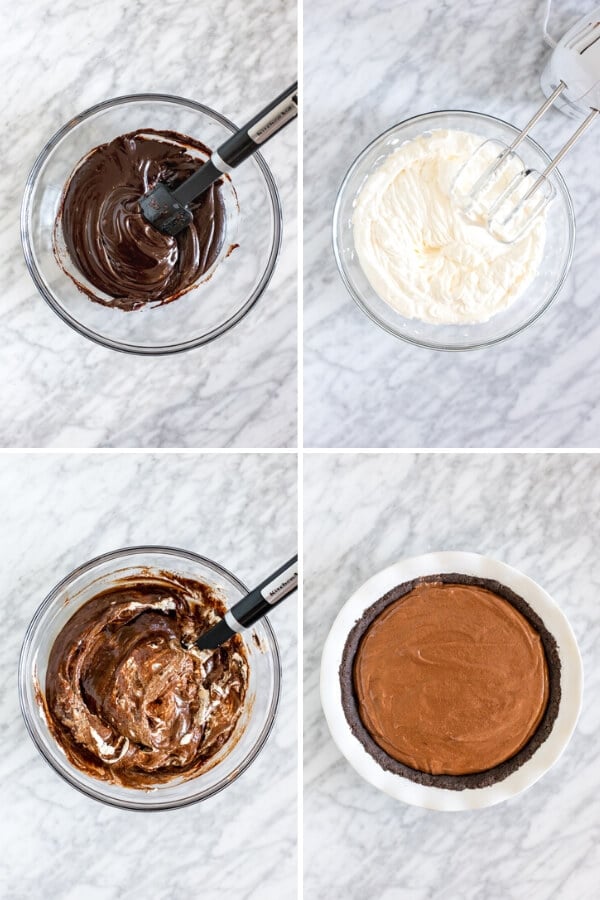
Nigella Lawson taught me how to make shortcut chocolate mousse. Instead of the traditional raw eggs and sugar – we’re using mini marshmallows.
- First, you’ll melt together butter, dark chocolate, water and marshmallows. The marshmallows sweeten the mixture and keep the texture sturdy but still light and airy. If you notice the butter seems to be separating from the mixture – stir it quite vigorously for everything to come together.
- Then in a separate bowl, you’ll whip heavy cream until stiff peaks form.
- The whipped cream gets gently folded into the chocolate mixture until it’s smooth. Make sure to fold in the whipped cream using a rubber spatula to keep the volume in the whipped cream. The filling will seem more liquidy at this point, but it will firm up in the fridge.
- Then spoon/pour the filling into the Oreo crust – and place the pie in the fridge to firm up.
After the pie is fully set (about 4 hours), top with whipped cream, and it’s time to serve. I highly, highly recommend serving the pie with whipped cream because it balances out the rich chocolate flavor. Serving with raspberry sauce or fresh berries can also be a nice addition.
Note: How rich your pie tastes will depend on what kind of chocolate you choose. Chocolate mousse should have a dark chocolate flavor, without being too sweet. I recommend using somewhere between 50-70% dark chocolate. Semi-sweet is ok if you don’t like an overly rich flavor, but I do not recommend using milk chocolate. Make sure to use baking chocolate (from the baking aisle of the grocery store) because it’s designed to melt properly. Do not use chocolate chips either – they have stabilizers to prevent the chocolate from melting.
And if you love this chocolate mousse pie, be sure to try:
- Fudge Brownie Pie
- Peanut Butter Pie – it’s no bake
- or this No-Bake Chocolate Ganache Pie

Chocolate Mousse Pie
Ingredients
Oreo Crust
- 25 Oreo Cookies, wafers and filling
- 4 tablespoons unsalted butter, melted
Mousse Filling
- 8 oz dark chocolate*, 50-70%
- 3 tablespoons unsalted butter, cut into a few pieces
- 2 cups mini marshmallows
- 1/3 cup water
- 1 2/3 cup heavy cream
Topping
- 1/2 cup heavy cream
- chocolate shavings*
Instructions
Oreo Crust
- Crush the Oreo cookies in a food processor or by placing the cookies in a ziploc bag and bashing them with a rolling pin.
- Place the crushed cookies in a bowl and stir together with the melted butter.
- Press the mixture into the bottom and up the sides of a 9-inch pie plate. Place in the fridge as you make the filling.
Chocolate Mousse Filling
- Chop the chocolate into very, very small pieces.
- Add the butter, chopped chocolate, mini marshmallows and water to a large heavy bottom saucepan.
- Turn the burner to low heat and gently stir as the mixture starts to melt. Be very careful that the chocolate doesn't burn.
- Once completely melted, remove from the heat. Whisk vigorously if the butter seems to be separating.
- In a separate large bowl, beat the heavy cream until stiff peaks form.
- Gently fold the whipped cream into the cooled chocolate mixture using a rubber spatula until the mixture is no longer streaky. Go gently to keep the volume from the whipped cream.
- Spoon the chocolate mousse filling into the pie plate and smooth the top. Cover the top of the pie plate, and place in the fridge to set for at least 4 hours.
Whipped Topping
- When ready to serve, remove the pie from the fridge.
- In a large bowl, beat the whipped cream until soft peaks form.
- Spoon the whipped cream on top of the pie and (optionally) sprinkle the top with chocolate shavings.
- Slice the pie with a thin, sharp knife - such as a paring knife (do not use a table knife) being sure to cut all the way through the crust.
Notes
- Semi-sweet chocolate can be used for a sweeter pie. Make sure to use high-quality baking chocolate and not chocolate chips.
- To make chocolate shavings, use a paring knife to brush chocolate shavings off of a chocolate bar. Always move the knife away from you.
- Store leftovers covered in the fridge for up to 4 days. Pie can be easily made 1 day in advance.
- Nutrition information is based on 1 piece, assuming the pie is cut into 10 equal pieces. You only need a very small sliver of the pie, as it is very rich.
Nutrition


If I use gelatin free marshmallows will I get the same results as regular ones?
Unfortunately, I haven’t tried with gelatin free marshmallows – so I’m not sure of the results