Red Velvet Oreo Cheesecake
I may receive compensation in the form of payment or products to supplement my posts, but all opinions remain my own. Read our disclosure policy.

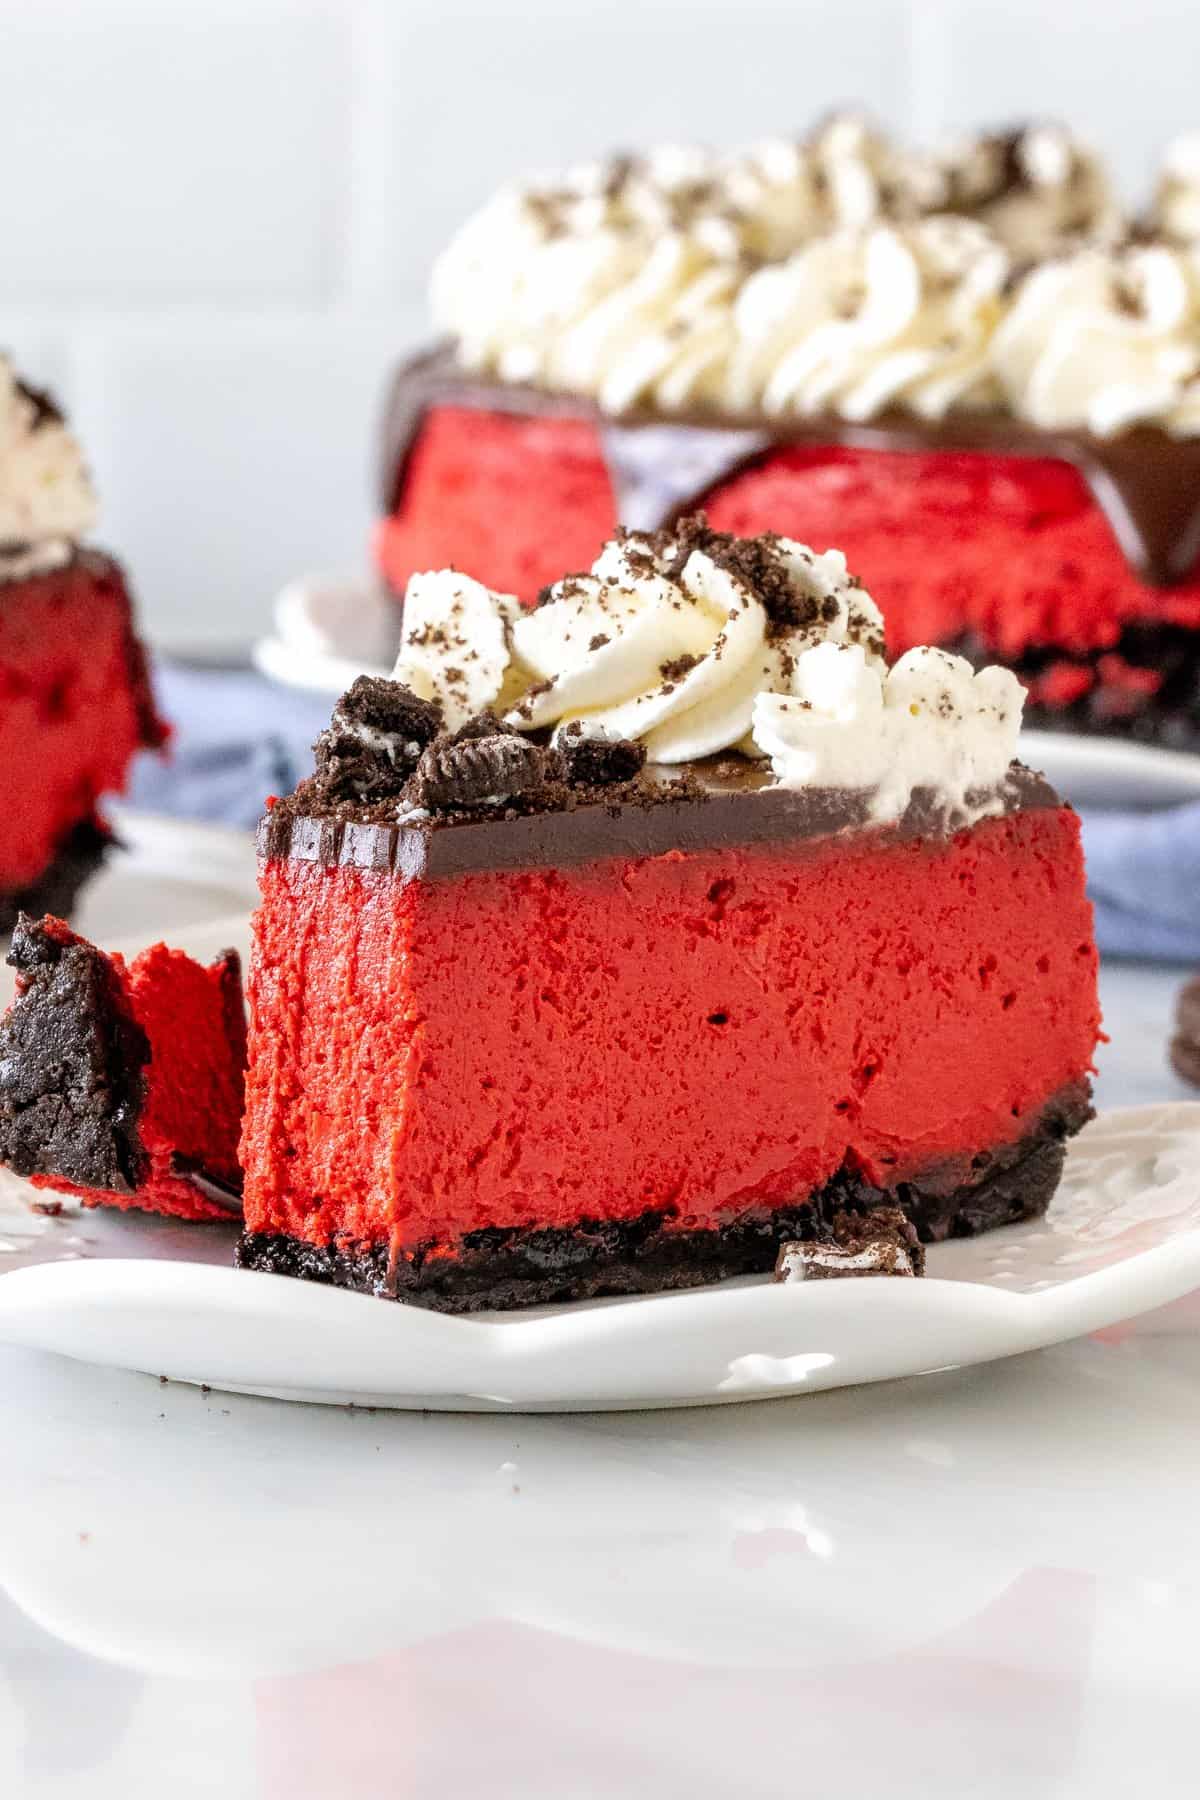
This decadent Red Velvet Oreo Cheesecake has a perfectly creamy red velvet flavor with a silky smooth texture and beautiful red color. It has a thick Oreo crust with even more Oreos on top for the ultimate flavor combo!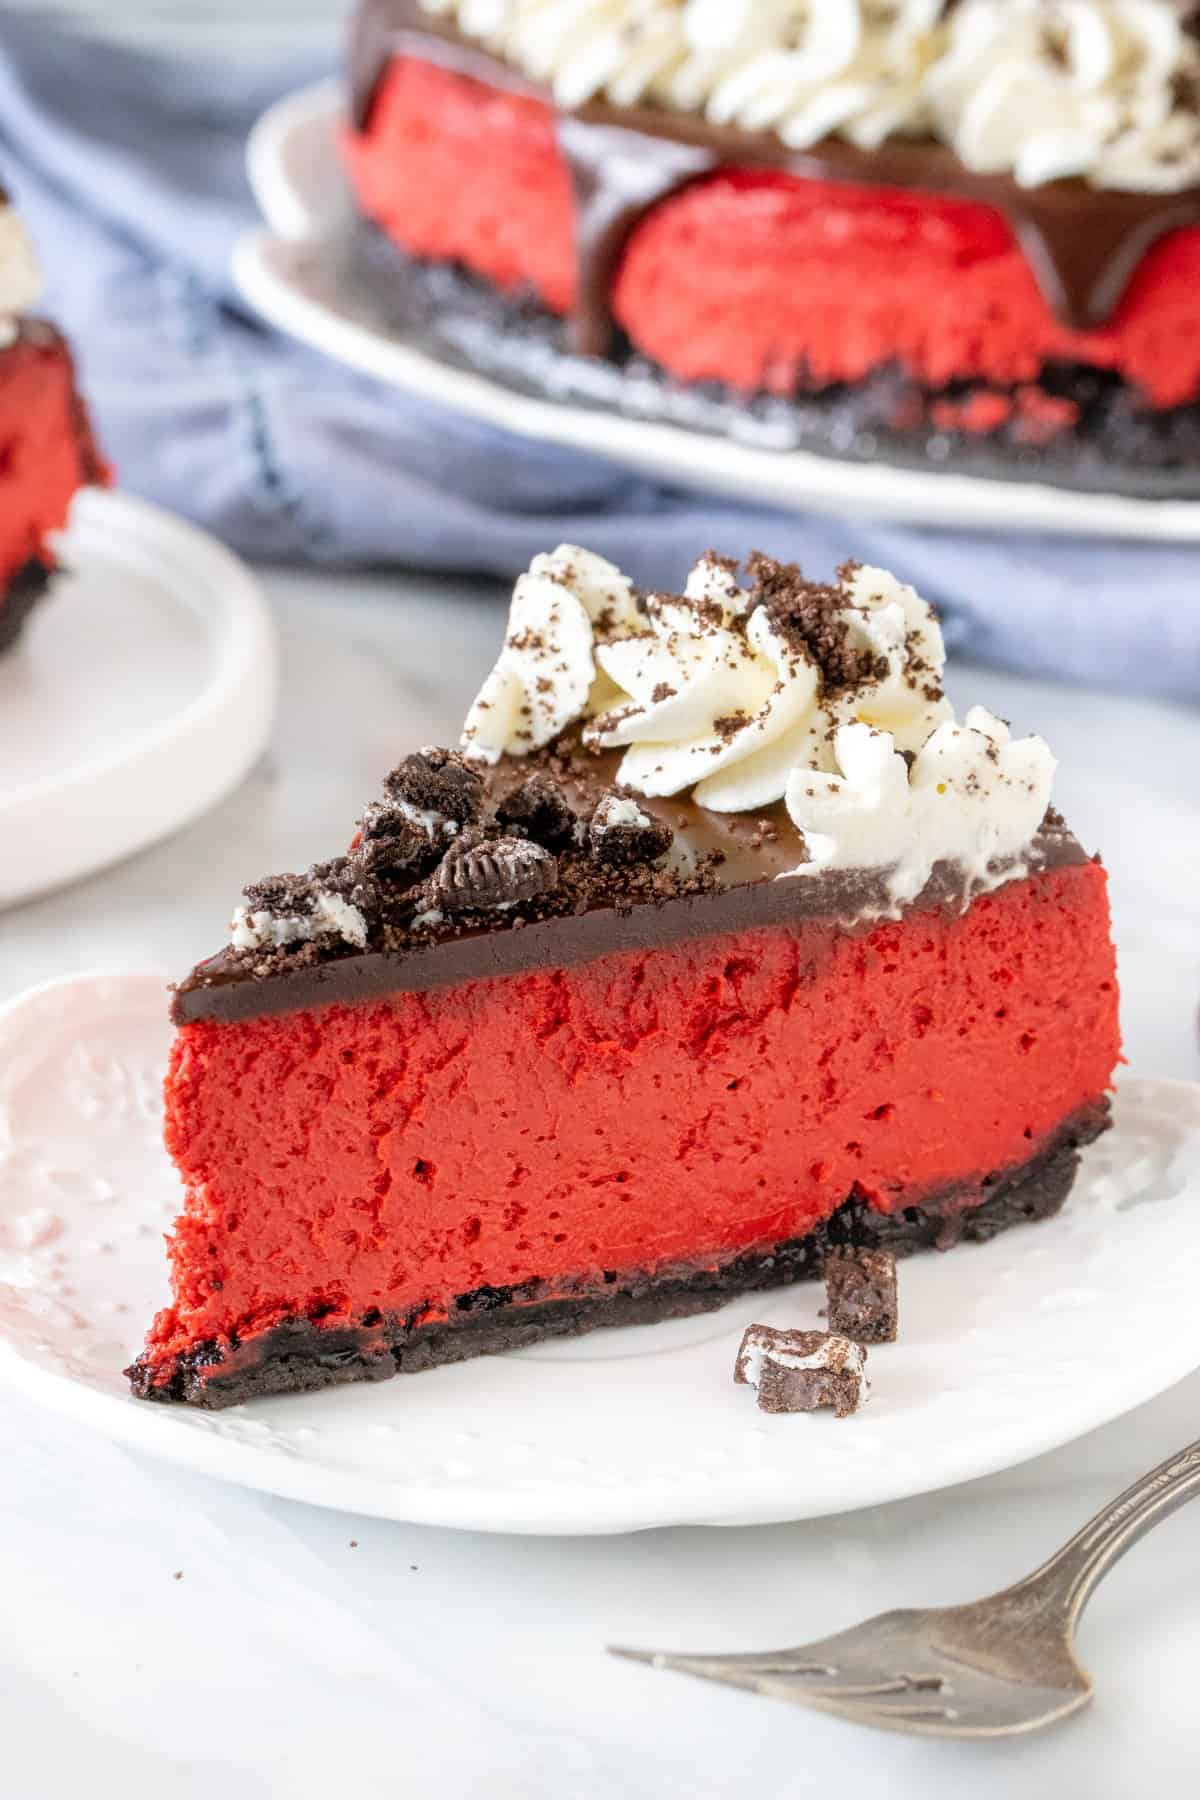
Super Decadent Red Velvet Oreo Cheesecake
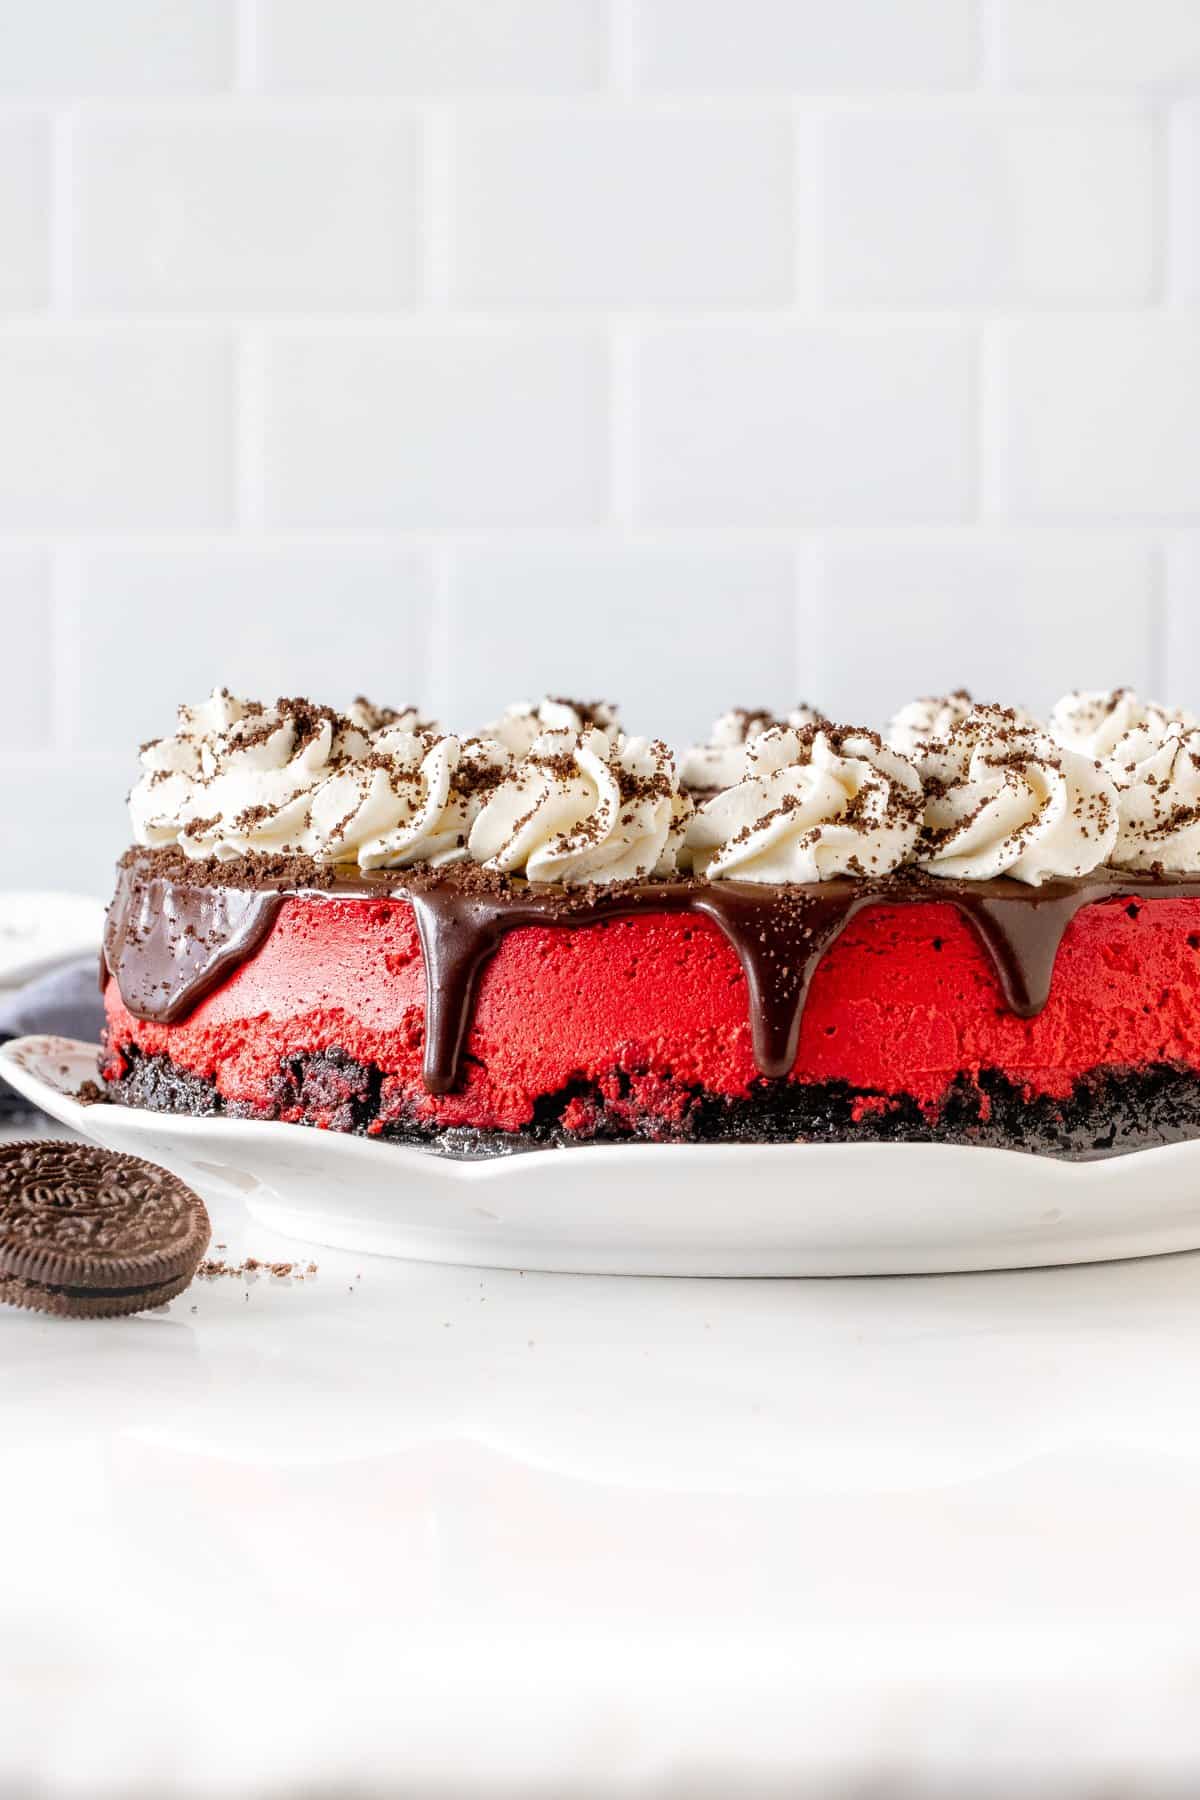
If you’re looking for an incredibly decadent cheesecake recipe – then look no further than this red velvet Oreo cheesecake. It combines 2 classic desserts, red velvet cake and creamy Oreo cheesecake. The deep red color makes the cheesecake look absolutely beautiful and perfect for impressing any dinner guests.
The Oreo crust is extra thick . Then it’s topped with chocolate ganache, whipped cream and even more crushed Oreo cookies.
There are a few key ingredients in red velvet cake, and this red velvet cheesecake has all of those components:
- a hint of cocoa powder
- buttermilk and a touch of vinegar to create a slightly tangy flavor
- red food coloring for the perfect red color.
The rest of the ingredients and baking process is what you’d expect from any cheesecake recipe.
Baking Tips & Ticks
- Cheesecake needs to cool slowly, then chill in the fridge for at least 6 hours before serving. Therefore, I recommend baking the cheesecake the day before you plan to serve. Chill overnight in the fridge, then add the ganache the next day. Pop it back in the fridge until you’re ready to serve.
- The cream cheese, sour cream, buttermilk and eggs all must at room temperature before getting started. This ensures that everything mixes together without any lumps and without over beating. Take them out of the fridge about 30 minutes before getting started.
- Make sure to bake the crust on its own first. This helps to keep it crunchy.
- The amount of food coloring is up to you. I used 1 1/2 tablespoons for a very vibrant red color. Feel free to use less. Gel or liquid works for this recipe.
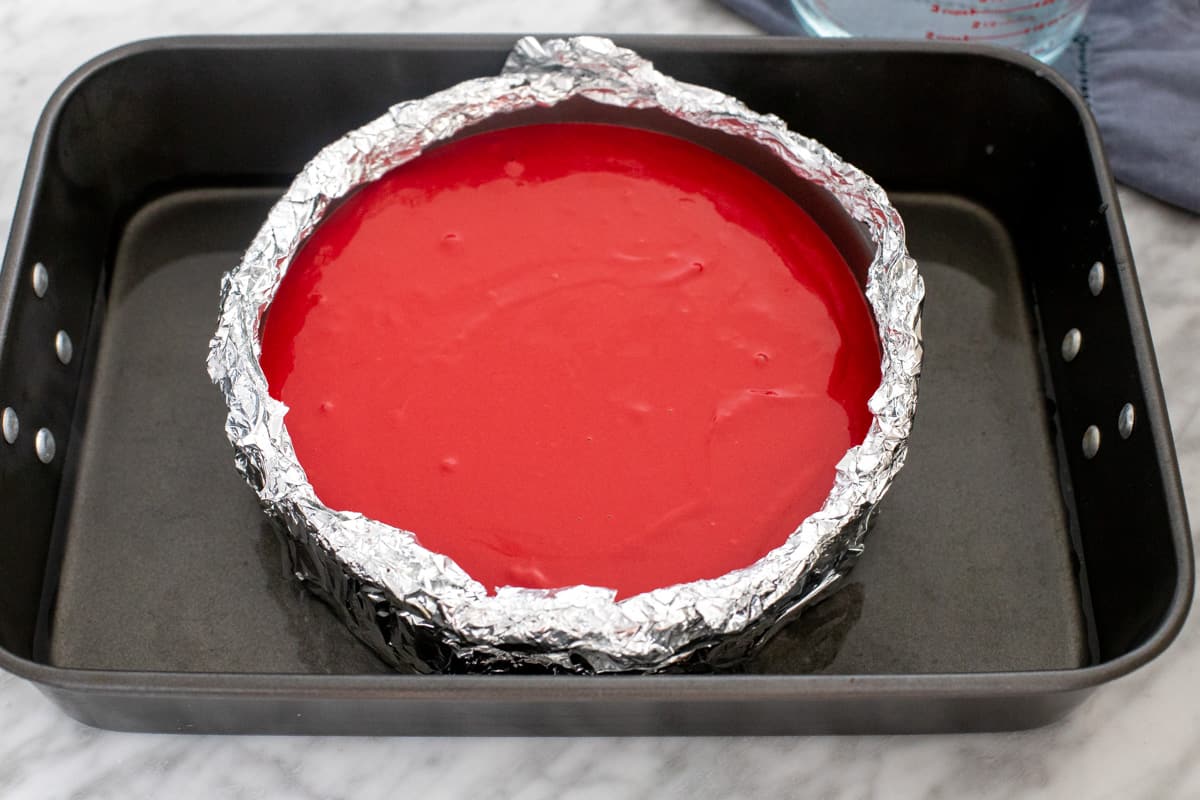
- Bake the cheesecake in a water bath. This method keeps moisture in and minimizes changes in temperature, which can cause the cheesecake to crack. You’ll wrap the outside of the pan (bottom and sides) in at least 3 layers of tin foil to ensure that all the seems are covered. The cheesecake is placed in a large roasting pan, then you’ll pour about 1/2 – 1 inch (1.5 – 2.5 cm) of hot water into the roasting pan. The whole thing goes in the oven to bake. You can see what this looks like below
It’s creamy, decadent and looks absolutely striking with it’s deep red color and chocolate topping – this red velvet Oreo cheesecake is the kind of recipe for when you’re looking for something impressive. It’s obviously rich, but not sickeningly sweet. The slight hint of cocoa and tanginess gives you the perfect red velvet flavor in cheesecake form. Then the chocolate ganache, crushed Oreos on top and thick Oreo crust really take it to the next level.
And if you need more red velvet or Oreo recipes in your baking arsenal, then be sure to try:
- Red Velvet Cupcakes
- Red Velvet Chocolate Chip Cookies
- Chocolate Chip Red Velvet Muffins
- Oreo Cream Pie
- Oreo Cheesecake Cookies

Red Velvet Oreo Cheesecake
Equipment
- 9-inch springform pan
- large roasting pan (big enough for the springform pan to fit inside)
Ingredients
Oreo Crust
- 26 Oreo cookies , wafers and filling
- 1/3 cup unsalted butter (75 grams) , melted
Red Velvet Cheesecake Filling
- 24 ounces full-fat cream cheese (680 grams) , brick-style, at room temperature
- 1 1/4 cup granulated sugar (250 grams)
- 3 tablespoons cocoa powder , I prefer natural over Dutch-process
- 3/4 cup sour cream (180 ml) , room temperature
- 1/4 cup buttermilk (60 ml) , room temperature
- 2 teaspoons distilled vinegar, white vinegar is fine
- 1 - 1 1/2 tablespoons red food coloring (15 - 22.5 ml) , gel or liquid
- 4 large eggs, whisked
- boiling water, for the water bath
Chocolate Ganache
- 4 ounces dark chocolate (56 grams) , I used 50%, semi-sweet works too
- 1/2 cup whipping cream (120 ml) , or heavy cream, around 35% MF
Topping
- 1/2 cup whipping cream (120 ml) , optional
- 3-4 Oreos , crushed or chopped, for decorating
Instructions
- Preheat the oven to 350F (180C or 160C on a fan-forced oven).
- Wrap the outside of a 9-inch springform pan with heavy duty aluminum foil. Wrap it at least 3 times so that the bottom and sides are covered and all the seems are covered.
Oreo Crust
- Crush the cookies (wafers and filling) in a food processor or blender until they're fine crumbs. Optionally, place the cookies in a freezer bag and crush with a rolling pin.
- Mix the crushed cookies with the melted butter.
- Press into the bottom and just slightly up the sides of the springform pan.
- Bake in the preheated oven for 8 minutes. Remove from the oven. Keep the oven turned on.
Cheesecake Filling
- As the crust is baking, make the filling.
- In a very large bowl, beat together the cream cheese and sugar until smooth and creamy. Then beat in the cocoa powder. Turn off the mixer and scrape down the sides and bottom of the bowl.
- With the mixer on a low speed, beat in the sour cream. Then mix in the buttermilk, vinegar and food coloring.
- Whisk the eggs together. Then carefully beat the eggs into the batter a little at a time - I did 3 additions.
Baking and Cooling
- Place the springform pan (still wrapped in foil) in the middle of the large roasting pan.
- Pour the cheesecake batter over the crust and smooth the top.
- Pour the boiling water into the roasting pan so that there's about 1/2 - 1 inch (about 1.5 - 2.5 cm) or water in the roasting pan surrounding the springform pan.
- Place the roasting pan (with the cheesecake inside) in the oven (it should still be at 350F from before). Bake for 55-65 minutes, or until the top looks just set and if you give the pan a gentle nudge the cheesecake still has a wobble like jello or pudding, but doesn't wobble like a liquid.
- Remove the roasting pan from the oven. Cool the cheesecake inside the roasting pan. When the water is room temperature, remove the cheesecake and place on a cooling rack to continue cooling.
- Once the pan feels room temperature, cover the top and place in the fridge to chill for at least 6 hours or overnight. This is necessary for the cheesecake to properly set.
Topping and Serving
- For the ganache, chop the chocolate into very fine pieces and place in a heatproof bowl.
- Heat 1/2 cup cream until almost boiling.
- Pour the hot cream over the chopped chocolate. Let it sit for 2-4 minutes, then whisk until smooth. If the chocolate hasn't quite melted, heat in the microwave on medium power for 30 seconds, then whisk.
- Remove the cheesecake from the fridge. Trace around the outside with a thin, sharp knife. Then unclamp the outer ring of the springform pan.
- If there's condensation on top of the cheesecake, blot with a paper towel to remove.
- Pour the ganache over the cheesecake, allowing it to drip over the edge. Place back in the fridge until ready to serve.
- Beat the remaining 1/2 cup cream until peaks form.
- Transfer the cream to a piping bag (I used a 1M tip). Pipe rosettes around the edges of the cheesecake.
- Crush or chop the Oreos, then sprinkle on top of the cheesecake.
- Slice with a thin, sharp knife. Be sure to slice through the crust.
Notes
- Room Temperature Ingredients: It's imperative that the cream cheese, sour cream, buttermilk and eggs should be room temperature before getting started.
- Cream Cheese: Make sure to use full-fat, brick-style cream cheese. Do not use anything labeled light, spreadable or whipped.
- Make Ahead Tips: I always make the cheesecake the day before I plan to serve. Let it cool, then cover and chill in the fridge overnight. The next day I'll make the ganache and place the cheesecake back in the fridge. Then I'll add the whipped cream and crushed Oreos right before serving.
- Nutrition: Nutrition details provided are an estimate only and based on 1 slice with ganache, crushed Oreos and whipped cream on top - assuming that the recipe is sliced into 12 equal pieces. You can likely get up to 14 pieces with this recipe.
- Storage: Store leftovers covered in the fridge for up to 5 days.
Nutrition

Thank you for your recipe