No Bake Peanut Butter Cheesecake
I may receive compensation in the form of payment or products to supplement my posts, but all opinions remain my own. Read our disclosure policy.

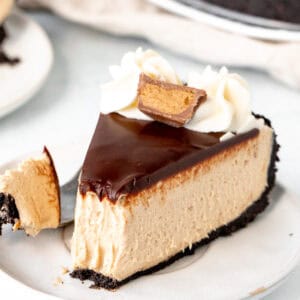
This no bake peanut butter cheesecake has an Oreo cookie crust, creamy peanut butter flavor, and chocolate topping. It’s decadent, smooth, super creamy and ridiculously easy to make.

**This post was updated on May 2025 with new photos and step-by-step tips**
Table of Contents
Why You’ll Love this Peanut Butter Cheesecake
Tangy cheesecake, creamy peanut butter and Oreo cookies come together to make this delicious no bake peanut butter cheesecake. The recipe takes very little prep time and is way easier than making a traditional cheesecake recipe. There’s no potential for your cheesecake to crack – unlike a baked cheesecake – and the cheesecake sets perfectly.
The recipe starts with a simple chocolate cookie crust. Then the peanut butter cheesecake is smooth, creamy, slightly tangy, and almost like a peanut butter mousse. I like to add a chocolate ganache topping, whipped cream and peanut butter cups on top – but that’s optional.
Now, I love making a traditional baked peanut butter cheesecake, but when you’re short on time or it’s too hot outside to turn on your oven, then this recipe is definitely the way to go.

Method – with Step-by-Step Photos
The recipe starts with an Oreo cookie crust. I love to make a thick crust that goes up the sides of the pan because it really supports the cheesecake.
- Crush the Cookies. We’re using whole Oreo cookies. You can do this in a food processor or by placing the cookies in a freezer bag and crushing with a rolling pin.
- Mix in the Butter. I typically do this in a small bowl with a fork. If you used a food processor to crush the cookies, you can add the melted butter to the food processor and do a few short bursts.
- Form the Crust. For this recipe, there’s enough for the crust to go along the bottom and up the sides of the pan (about 1/2 to 3/4 to the top).
- Freeze. Pop in the freezer as you make the filling.

Then it’s time to get on with the filling.
- Make the Whipped Cream. Beat the whipping cream until stiff peaks form. You want to use whipping cream or heavy cream from a carton that’s about 33-35% MF. Set aside.
- Beat the Cream Cheese & Powdered Sugar. It’s important to occasionally turn off the bowl and scrape down the bottom and sides of the bowl to remove lumps. It should be completely smooth when finished.
- Mix in the Peanut Butter, Sour Cream & Vanilla. Again, you want to scrape down the bottom and sides of the bowl as you go to avoid lumps.

- Fold the Whipped Cream into the Cream Cheese Mixture. Do this gently using a rubber spatula to keep the airiness. When finished you should no longer see whipped cream and it should be an even consistency.

- Spoon into the Crust & Smooth the Top.

- Chill. It will need to chill in the fridge for at least 6 hours to set properly.
Recipe Tip
Be sure to use full-fat, brick style cream cheese. If you use anything that is low fat, spreadable or comes in a tub – the cheesecake won’t set properly.
Serving Tips
After the cheesecake has set in the fridge, it gets topped with chocolate ganache, whipped cream and peanut butter cups. I typically make the cheesecake the night before I plan to serve it. Then I’ll make the ganache topping sometime during the day and pop the cheesecake back in the fridge for the ganache to set.
When you’re ready to serve, you’ll unclamp the outer ring of the springform pan. The cheesecake will stay on the bottom of the springform – I just set it on a plate. Be sure to slice with a thin, sharp knife and cut all the way through the Oreo crust.

Creamy, delicious and completely no-bake – this peanut butter cheesecake ticks all the boxes. And if you’re looking for more delicious no-bake cheesecake recipes, be sure to try:
- Classic No-Bake Cheesecake
- No-Bake Chocolate Cheesecake
- No-Bake Strawberry Cheesecake
- No-Bake Cherry Cheesecake Bars

No-Bake Peanut Butter Cheesecake
Equipment
- 9-inch (23-cm) round springform pan
Ingredients
For the Oreo Crust
- 36 Oreo cookies, wafers and filling
- 7 tablespoons unsalted butter (98 grams), melted
For the Cheesecake Layer
- 1 cup whipping cream (240 ml) , at least 33% MF
- 24 ounces full-fat cream cheese (680 grams), softened to room temperature
- 1 1/4 cup smooth peanut butter, do not use natural or homemade
- 1 1/4 cup powdered sugar (138 grams), sifted
- 1/4 cup sour cream (60 ml)
Chocolate Ganache
- 4 oz dark chocolate* (112 grams), or semi-sweet
- 1/3 cup whipping cream (80 ml), or heavy cream
To Serve
- 1/2 cup whipping cream (120 ml)
- peanut butter cups
Instructions
- Lightly spray a 9-inch round springform pan with non-stick cooking spray.
Oreo Crust
- Pulse the Oreo cookies (wafers and filling) in a food processor until fine crumbs. Or place in a freezer bag and crush with a rolling pin.
- Mix in the melted butter – either stir together with a fork in a small bowl, or add the melted butter to the food processor and pulse a few times until combined.
- Press the mixture into the bottom and up the sides (about 1/2 to 3/4 to the top) of the springform pan.
- Place in the freezer as you make the filling.
Cheesecake Filling
- In a large bowl, beat the whipping cream until stiff peaks form. Set aside.
- In a separate large bowl, beat together the cream cheese and sifted powdered sugar until smooth and creamy (about 3-4 minutes). Occasionally turn off the mixer and scrape down the sides and bottom of the bowl.
- Beat the peanut butter, sour cream and vanilla into the cream cheese mixture. It will be very thick. Again, be sure to occasionally turn off the mixer and scrape down the bottom and sides of the bowl.
- Carefully fold the whipped cream into the peanut butter mixture using a rubber spatula. Gently fold the mixture until you no longer see and streaks of whipping cream. The mixture should be an even consistency when finished.
- Spoon the mixture over the crust and smooth the top.
- Cover the pan and place the cheesecake in the fridge to set for at least 6 hours or overnight. I typically make the cheesecake the night before I plan to serve it.
Chocolate Ganache
- Finely chop the chocolate and place in a heatproof bowl.
- Heat the cream until almost boiling – this can be done either in 30 second intervals in the microwave (go slowly to avoid burning) or in a double boiler.
- Pour the hot cream over the chopped chocolate and let sit for 2-3 minutes. Then whisk until smooth. If the chocolate hasn't quite melted, microwave for 30 seconds on medium power (not high or the chocolate can burn or bake) and whisk. Repeat as needed. Alternatively, place the bowl over a double boiler over gently simmering water and whisk until smooth.
- Remove the cake from the fridge. Trace around the outside of the cake with a sharp knife, then unclamp the springform pan.
- Pour the ganache over the cheesecake and smooth into an even layer. Place back in the fridge until ready to serve.
Serving
- Optionally, beat the additional 1/2 cup whipping cream until stiff peaks form. Transfer to a piping bag with a star tip (I used a 1M tip). Pipe rosettes of cream around the edges of the cheesecake and decorate with peanut butter cups.
- Slice into pieces using a thin, sharp knife, being sure to cut through the crust. For clean cuts, wipe the knife in between each cut.
Notes
- Cream Cheese: Make sure to use full-fat, brick-style cream cheese. Do not use lite or spreadable – otherwise, the cheesecake will not set properly.
- Cool Whip: I prefer this recipe with whipped cream instead of whipped topping. However, if you prefer to use whipped topping, skip step 1 of the cheesecake filling. In step 4, fold in 1 1/2 cups thawed whipped topping.
- Storage: Store leftovers covered in an airtight container in the fridge for up to 4 days.
- Nutrition: Information is an estimate only and based on 1 slice with chocolate ganache (but without whipped cream and peanut butter cups around the edges), assuming that the cheesecake is cut into 14 equal pieces.
Nutrition


I made this for my grandson;s birthday and he loved it! It is so creamy and delicious! Most defenently will make this again. My family loves peanut butter and chocolate. Easy and quick! (I did use cool whip in place of the whipping cream and it worked great!)
This was the easiest & best tasting peanut butter pie ever! Everyone loved it! So fast to put together ( i used ready made cool whip- the 2 cups, )& it just turned out perfect. Thanku ! Will definitely be making this again.
I stumbled across this recipe, looked interesting. I bought all the ingredients. Served it to some guests. It is without a doubt the BEST Tasting dessert I have ever made. My sister thought I got it from a restaurant or bought it frozen and thawed it. When I showed her the recipe, she loved it. Also took home a copy. My daughter also took some to her job. I got several more requests for the recipe. Thank you so much!!!
Would it be possible to put this in the freezer to have it chill faster? Hopefully this isn’t a silly question.
You could put it in the freezer. It would be more of a frozen peanut butter pie then. Also, the crust can be quite hard to slice through if it’s been frozen. It’s definitely possible to place in the freezer, but it won’t be the same mousse-like texture.
Can you use cool whip instead of making your own whipped cream. Thank you
That would be fine. You’ll want to thaw the cool whip in the fridge, then measure out about 2 cups. (1 cup whipping cream makes about 2 cups whipped cream).
My boyfriend doesn’t like Oreos. Can I use Graham cracker crumbs instead?
Absolutely!
I’m making this for a picnic and wondering would a chocolate ganache work as the topping. I won’t have access to a microwave to heat up the chocolate chips. I’m making these in mini Masson jars for the perfect picnic dessert. Also I am swapping the Oreo crumb crust for one using homemade chcolate wafer cookies. Can’t wait to try these out.
That’s so smart to make these in mason jars. It would definitely be fine to add the chocolate before hand. I might add 1-2 teaspoons of butter to the melted chocolate just so it’s a little softer. Have fun at your picnic! 🙂